[2023.1.5.목] 스프링 MVC 웹 애플리케이션 2 (조립, 회원가입, 예외처리)
1. 컨트롤러, 매퍼, 서비스 연결
주소창에 다 입력하기 싫을 때
서버에서 프로젝트 제거!! -> 프로젝트 -> properties -> web project settings -> '/'로 변경
-> localhost/home 만 입력해도 됨 (원래는 localhost/spring-web/home)


* web.xml에 태그 라이브러리 jsp파일이 모든 jsp 파일에 추가되도록 정의

Q. navbar.jsp와 tags.jsp의 include 방식이 다른 이유
tags.jsp는 맨위에 들어가면 되지만
navbar.jsp는 위치가 정해져 있음

* navbar.jsp
- 내비게이션 바

* tags.jsp
- el, jstl을 사용할 수 있는 태그, 날짜포맷을 사용할 수 있는 태그 등등

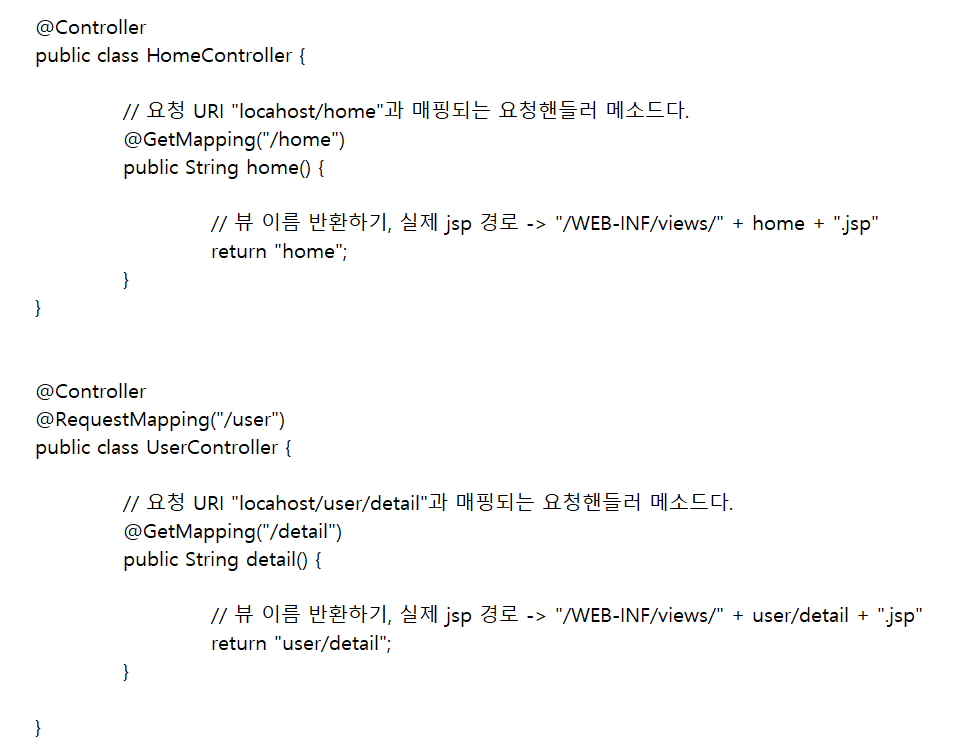
* HomeController

* home.jsp , login-form.jsp, register-fom.jsp 에 공통 내비바 추가,
jsp에 이름 세팅하기 (<c:set>) -> 내비바에서 클릭하면 활성화하기 위함

- home.jsp

- login-form.jsp

- register-form.jsp


* DB 액세스를 위한 환경설정
- db.properties 파일 : 데이터베이스 연결하는 정보 설정


- database-context.xml 데이터베이스 연결 설정


* db 연결 정보, 커넥션 풀, 매퍼 스캔 설정
- mybatis-config.xml 마이바티스 환경설정


* null이 허용된 곳에 진짜로 null이 들어갈 수 있도록 하기, 로그출력하기
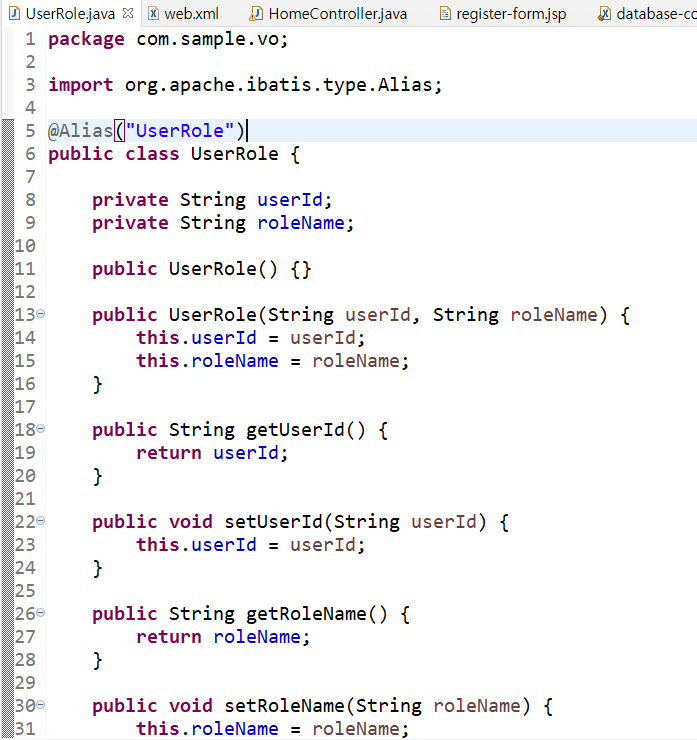
- VO 객체 생성 (User, UserRole)
@Alias : parameterType, resultType에 User만 적으면 됨

- Mapper 인터페이스 정의

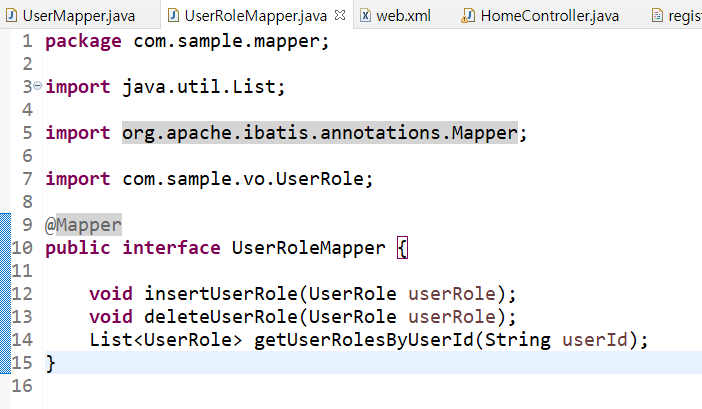
- 인터페이스와 매핑되는 매퍼파일 생성 (users.xml, user-roles.xml)

- users.xml
<?xml version="1.0" encoding="UTF-8"?>
<!DOCTYPE mapper PUBLIC "-//mybatis.org//DTD Mapper 3.0//EN" "http://mybatis.org/dtd/mybatis-3-mapper.dtd" >
<mapper namespace="com.sample.mapper.UserMapper">

	<!-- void insertUser(User user) -->
	<insert id="insertUser" parameterType="User">
		insert into spring_users
			(user_id, user_password, user_name, user_email, user_tel)
		values
			(#{id}, #{password}, #{name}, #{email}, #{tel})
	</insert>

	<!-- void updateUser(User user) -->
	<update id="updateUser" parameterType="User">
		update
			spring_users
		set
			user_password = #{password},
			user_tel = #{tel},
			user_photo = #{photo},
			user_deleted = #{deleted},
			user_updated_date = sysdate
		where
			user_id = #{id}
	</update>

	<!-- User getUserById(String userId) -->
	<select id="getUserById" parameterType="string" resultType="User">
		select
			user_id	as id,
			user_password as password,
			user_name as name,
			user_email as email,
			user_tel as tel,
			user_photo as photo,
			user_deleted as deleted,
			user_updated_date as updatedDate,
			user_created_date as createdDate
		from
			spring_users
		where
			user_id = #{value}
	</select>

	<!-- User getUserByEmail(String email) -->
	<select id="getUserByEmail" parameterType="string" resultType="User">
		select
			user_id	as id,
			user_password as password,
			user_name as name,
			user_email as email,
			user_tel as tel,
			user_photo as photo,
			user_deleted as deleted,
			user_updated_date as updatedDate,
			user_created_date as createdDate
		from
			spring_users
		where
			user_email = #{value}
	</select>

</mapper>
- user-roles.xml
<?xml version="1.0" encoding="UTF-8"?>
<!DOCTYPE mapper PUBLIC "-//mybatis.org//DTD Mapper 3.0//EN" "http://mybatis.org/dtd/mybatis-3-mapper.dtd" >
<mapper namespace="com.sample.mapper.UserRoleMapper">

	<!-- void insertUserRole(UserRole userRole) -->
	<insert id="insertUserRole" parameterType="UserRole">
		insert into spring_user_role
			(user_id, user_role_name)
		values
			(#{userId}, #{roleName})
	</insert>

	<!-- void deleteUserRole(UserRole userRole) -->
	<delete id="deleteUserRole" parameterType="UserRole">
		delete from
			spring_user_roles
		where
			user_id = #{userId}
			and user_role_name = #{roleName}
	</delete>

	<!-- List<UserRole> getUserRolesByUserId(String userId) -->
	<select id="getUserRolesByUserId" parameterType="string" resultType="UserRole">
		select
			user_id as userId,
			user_role_name as roleName
		from
			spring_user_roles
		where
			user_id = #{value}
	</select>

</mapper>
- 서비스 객체를 스캔하는 service-context.xml 생성


* 서비스 객체 스캔
- web.xml 의 최종
<?xml version="1.0" encoding="UTF-8"?>
<web-app xmlns:xsi="http://www.w3.org/2001/XMLSchema-instance" xmlns="http://xmlns.jcp.org/xml/ns/javaee" xsi:schemaLocation="http://xmlns.jcp.org/xml/ns/javaee http://xmlns.jcp.org/xml/ns/javaee/web-app_3_1.xsd" id="WebApp_ID" version="3.1">

	<!--
		Root WebApplicationContext 생성하기 (루트에서 만드는 스프링 컨테이너)
		* <context-param /> 태그에 spring bean configuration 파일의 경로 및 이름을 지정한다.
		* <listener /> 태그에 ContextLoaderListener 클래스를 등록한다.
		* ContextLoaderListener
			- 리스너 클래스다.
			- <context-param /> 태그에 contextConfigLocation으로 설정된 빈 설정정보를 읽어서 루트 스프링 컨테이너를 생성한다.

		* Listener
			- Java Servlet API다.
			- Java Servlet의 이벤트처리를 지원하는 인터페이스다.
	 -->
    <context-param>
      <param-name>contextConfigLocation</param-name>
      <param-value>
         /WEB-INF/spring/database-context.xml
         /WEB-INF/spring/service-context.xml
      </param-value>
    </context-param>

   <listener>
      <listener-class>org.springframework.web.context.ContextLoaderListener</listener-class>
   </listener>

   <!--
   		클라이언트 <-> 서버 간 한글 텍스트 인코딩 처리를 지원하는 필터
    -->
   <filter>
   		<filter-name>encodingFilter</filter-name>
   		<filter-class>org.springframework.web.filter.CharacterEncodingFilter</filter-class>
   		<init-param>
   			<param-name>encoding</param-name>
   			<param-value>UTF-8</param-value>
   		</init-param>
   </filter>
   <filter-mapping>
   		<filter-name>encodingFilter</filter-name>
   		<url-pattern>/*</url-pattern>
   </filter-mapping>

	<!--
		DispatcherServlet은 spring mvc가 제공하는 FrontController이다.
		* 모든 URL 요청에 대해서(<url-pattern>/</url-pattern>) DispatcherServlet이 실행되도록 설정함
		* 아래의 설정정보에 지정된 web-context.xml 파일을 읽어서 DispatcherServlet이 스프링 컨테이너를 생성하게 한다.
		  스프링 컨테이너에는 web-context.xml에 설정된 클래스들이 스프링 컨테이너에 빈으로 등록된다.
		  스프링 컨테이너의 빈으로 등록된 객체들 중에는 HomeController, UserController, PostController 등 다양한 컨트롤러 객체가 포함되어 있다.
		  DispatcherServlet은 요청이 접수되면 요청 URI에 해당하는 매핑정보가 포함된 컨트롤러 객체를 스프링 컨테이너에서 가져와서 실행시킨다.
		  (/home 이면 HomeController를 실행)
		  <init-param>
			<param-name>contextConfigLocation</param-name>
			<param-value>/WEB-INF/spring/web-context.xml</param-value>
		  </init-param>

		  * 웹서버가 실행될 때 DispatcherServlet 객체를 생성하고, 초기화시키기
		  	<load-on-startup>1</load-on-startup>
		  	* 숫자1은 우선순위를 나타낸다. 서블릿객체를 여러개 등록하는 경우 숫자가 낮을 수록 먼저 생성되고 초기화된다.
		  	* 사용목적 : 웹서버가 켜질 때 DispatcherServlet 객체를 생성하고, 초기화 작업을 완료시키기 위해서 설정한다.
		  	* DispatcherServlet 초기화 과정에서 <init-param />태그의 정보를 읽어서 Spring Container를 생성하고,
		  	  설정정보를 분석해서 필요한 객체를 생성하고, 조립한다.
	 -->
	<servlet>
		<servlet-name>app</servlet-name>
		<servlet-class>org.springframework.web.servlet.DispatcherServlet</servlet-class>
		<init-param>
			<param-name>contextConfigLocation</param-name>
			<param-value>/WEB-INF/spring/web-context.xml</param-value>
		</init-param>
		<load-on-startup>1</load-on-startup>
	</servlet>
	<servlet-mapping>
		<servlet-name>app</servlet-name>
		<url-pattern>/</url-pattern>
	</servlet-mapping>

	<!--
		모든 jsp의 앞부분에 아래 경로가 include됨
	 -->
	<jsp-config>
		<jsp-property-group>
			<url-pattern>*.jsp</url-pattern>
			<include-prelude>/WEB-INF/views/common/tags.jsp</include-prelude>
		</jsp-property-group>
	</jsp-config>
</web-app>
***의존성 주입
* UserService 객체 ( 보통 메뉴당 서비스 메소드 1개 )

* HomeController
(서비스로 기능 구현을 넘기고 서비스의 메소드 사용)

* 의존성 주입 조립 관계
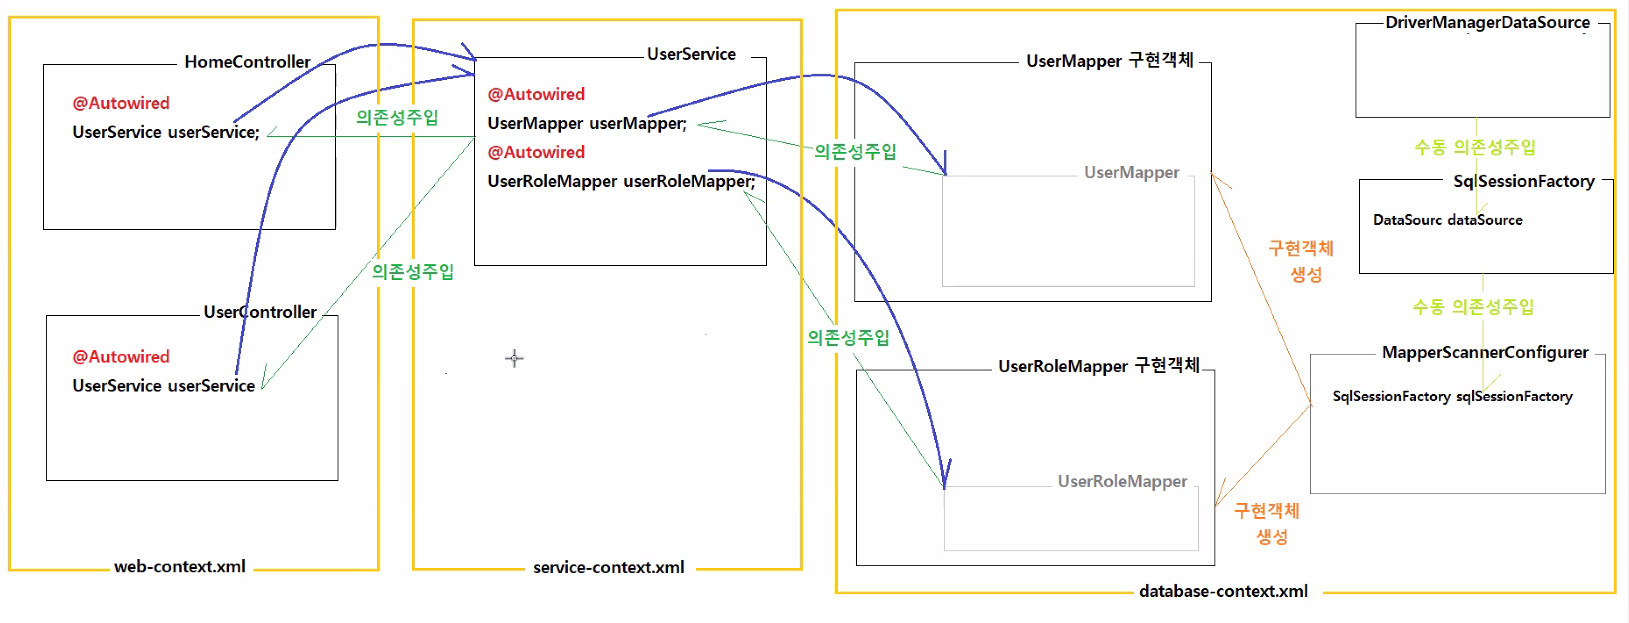
web-context : Controller 스캔
service-context : Service 스캔
database-context : db관련 스캔
컨트롤러 및 요청 핸들러 메소드 작성하기
- 컨트롤러 작성하기
* view 밑에서 내부이동 할 경우 -> 앞뒤 "/WEB-INF/views/" , ".jsp" 제외하고 딱 그 주소만 입력하면 됨

2. 스프링에서 회원가입 (폼입력값 받기)
* register-form.jsp (회원가입 폼)

* UserRegisterForm 객체 (입력폼의 name과 같은 변수를 갖는 객체) 생성

* HomeController (어노테이션을 주고 Service의 기능 구현 시키고, 뷰페이지 반환)

*******************************
링크 클릭 -> GET 방식
폼 입력 -> POST 방식
*******************************
* UserService (Mapper를 의존성 주입 받아서 기능 구현, ApplicationException 오류를 던짐)

3. 스프링 MVC의 예외처리 -> 오류페이지로 보내기
* RuntimeException을 상속받은 ApplicationException 예외 객체


* ExceiptionHandlerControllerAdvice 객체

- @ExceptionHandler(ApplicationException.class)
: ApplicationException 예외가 발생하면 -> 에러페이지 반환
* 500.jsp (오류페이지) 생성

예외처리하기 정리
