[인프런/스프링 DB 2편] 5. 스프링 트랜잭션
📌 @Transactional 사용
-> 트랜잭션 프록시 적용
-> 트랜잭션 AOP 처리
1. 트랜잭션 적용 확인
1) build.gradle
plugins {
	id 'java'
	id 'org.springframework.boot' version '3.1.1'
	id 'io.spring.dependency-management' version '1.1.0'
}

group = 'hello'
version = '0.0.1-SNAPSHOT'

java {
	sourceCompatibility = '17'
}

configurations {
	compileOnly {
		extendsFrom annotationProcessor
	}
}

repositories {
	mavenCentral()
}

dependencies {
	implementation 'org.springframework.boot:spring-boot-starter-data-jpa'
	compileOnly 'org.projectlombok:lombok'
	runtimeOnly 'com.h2database:h2'
	annotationProcessor 'org.projectlombok:lombok'
	testImplementation 'org.springframework.boot:spring-boot-starter-test'

        //테스트에서 lombok 사용
        testCompileOnly 'org.projectlombok:lombok'
        testAnnotationProcessor 'org.projectlombok:lombok'
}

tasks.named('test') {
	useJUnitPlatform()
}
2) TxBasicTest - 트랜잭션 적용 확인
package hello.springtx.apply;

import lombok.extern.slf4j.Slf4j;
import org.assertj.core.api.Assertions;
import org.junit.jupiter.api.Test;
import org.springframework.aop.support.AopUtils;
import org.springframework.beans.factory.annotation.Autowired;
import org.springframework.boot.test.context.SpringBootTest;
import org.springframework.boot.test.context.TestConfiguration;
import org.springframework.context.annotation.Bean;
import org.springframework.transaction.annotation.Transactional;
import org.springframework.transaction.support.TransactionSynchronizationManager;

import static org.assertj.core.api.Assertions.*;

@Slf4j
@SpringBootTest
public class TxBasicTest {

    @Autowired
    BasicService basicService;

    @Test
    void proxyCheck() {
        // 프록시 만들어졌는지 테스트
        log.info("aop class={}", basicService.getClass());
        assertThat(AopUtils.isAopProxy(basicService)).isTrue();
    }

    @Test
    void txTest() {
        // 트랜잭션 적용됐는지 테스트
        basicService.tx();
        basicService.nonTx();
    }

    @TestConfiguration
    static class TxApplyBasicConfig {
        @Bean
        BasicService basicService() {
            return new BasicService();
        }
    }

    @Slf4j
    static class BasicService {

        @Transactional
        public void tx() {
            log.info("call tx");
            boolean txActive = TransactionSynchronizationManager.isActualTransactionActive();
            log.info("tx active={}", txActive);
        }

        public void nonTx() {
            log.info("call nonTx");
            boolean txActive = TransactionSynchronizationManager.isActualTransactionActive();
            log.info("tx active={}", txActive);
        }
    }
}
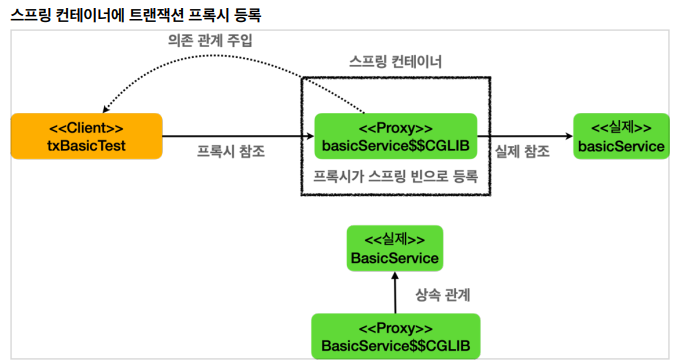
(1) proxyCheck()
- AopUtils.isAopProxy()
- @Transactional 을 특정 클래스나 메소드에 하나라도 사용 -> 스프링 트랜잭션 AOP 적용의 대상
-> 실제 BasicService 객체가 아닌, 프록시 객체가 스프링 빈에 등록 + 프록시 객체 주입
( 프록시는 BasicService를 상속해서 만들어지기 때문에 다형성 활용 -> BasicService가 부모객체)
- @Transactional 을 특정 클래스나 메소드에 하나라도 사용 -> 스프링 트랜잭션 AOP 적용의 대상

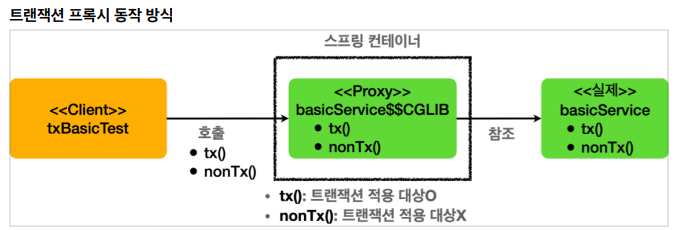
(2) txTest()
- application.properties 에 로그 추가
- 트랜잭션 시작과 종료를 명확하게 로그로 확인할 수 있음
logging.level.org.springframework.transaction.interceptor=TRACE
- basicService.tx() 호출
- 프록시의 tx() 호출 -> 프록시는 tx() 메소드가 트랜잭션을 사용할 수 있는지 확인 -> @Transactional 확인 -> 적용 대상 O
- 실제 basicService의 tx() 호출
- 호출이 끝나면 프록시는 트랜잭션 로직을 커밋/롤백 해서 트랜잭션 종료
- basicService.nonTx() 호출
- 프록시의 nonTx() 호출 -> 프록시는 nonTx() 메소드가 트랜잭션 사용할 수 있는지 확인 -> @Transactional 없음 -> 적용 대상 X
- 트랜잭션을 시작하지 않고, basicService의 nonTx() 호출하고 종료
- TransactionSynchronizationManager.isActualTransactionActive()
- 현재 스레드에 트랜잭션이 적용되어 있는지 확인

2. 트랜잭션 우선순위
1) TxLevelTest
package hello.springtx.apply;

import lombok.extern.slf4j.Slf4j;
import org.junit.jupiter.api.Test;
import org.springframework.beans.factory.annotation.Autowired;
import org.springframework.boot.test.context.SpringBootTest;
import org.springframework.boot.test.context.TestConfiguration;
import org.springframework.context.annotation.Bean;
import org.springframework.transaction.annotation.Transactional;
import org.springframework.transaction.support.TransactionSynchronizationManager;

@SpringBootTest
public class TxLevelTest {

    @Autowired
    LevelService service;

    @Test
    void orderTest() {
        service.write();
        service.read();
    }

    @TestConfiguration
    static class TxApplyLevelConfig {
        @Bean
        LevelService levelService() {
            return new LevelService();
        }
    }

    @Slf4j
    @Transactional(readOnly = true)
    static class LevelService {

        @Transactional(readOnly = false)	// 기본값 (생략가능)
        public void write() {
            log.info("call write");
            printTxInfo();
        }

        public void read() {
            log.info("call read");
            printTxInfo();
        }

        private void printTxInfo() {
            boolean txActive = TransactionSynchronizationManager.isActualTransactionActive();
            log.info("tx active={}", txActive);
            boolean readOnly = TransactionSynchronizationManager.isCurrentTransactionReadOnly();
            log.info("tx readOnly={}", readOnly);
        }
    }
}
* 스프링의 @Transactional 규칙
(1) 우선순위 규칙
더 구체적이고 자세한 것이 우선순위
- LevelService 클래스 : @Transactional(readOnly = true)
- write() 메소드 : @Transactional(readOnly = false) -> 적용
(2) 클래스에 적용하면 메소드는 자동 적용
- read() 메소드 : @Transactional 없음
- LevelService 클래스 : @Transactional(readOnly = true) -> 클래스의 트랜잭션 옵션 자동 적용
2) 결과
* write() 호출
readOnly = false 옵션 적용

* read() 호출
readOnly = true 옵션 적용

💡 인터페이스에 @Transactional 적용
1. 클래스의 메소드 (우선순위 ↑)
2. 클래스의 타입
3. 인터페이스의 메소드
4. 인터페이스의 타입
-> 별로 비추 -> 클래스에 적용할 것!
3. 🚨 트랜잭션 AOP 주의 사항
3-1. 프록시 내부 호출
프록시 내부 호출
(1) 원래
@Transactional 사용-> 트랜잭션 AOP 적용 -> 대상 객체 대신 프록시를 스프링 빈으로 등록 + 주입 !
-> 프록시 호출 -> 프록시에서 트랜잭션 적용 -> 프록시에서 대상 객체의 메소드 호출 ! => 트랜잭션 적용 보장
(2) 내부 호출 문제
대상 객체 내부에서 자신의 메소드 호출 -> 프록시를 거치지 않고 대상 객체 직접 호출 -> 트랜잭션 적용 X
1) 트랜잭션 내부 호출 예제
package hello.springtx.apply;

import lombok.extern.slf4j.Slf4j;
import org.junit.jupiter.api.Test;
import org.springframework.beans.factory.annotation.Autowired;
import org.springframework.boot.test.context.SpringBootTest;
import org.springframework.boot.test.context.TestConfiguration;
import org.springframework.context.annotation.Bean;
import org.springframework.transaction.annotation.Transactional;
import org.springframework.transaction.support.TransactionSynchronizationManager;

@Slf4j
@SpringBootTest
public class InternalCallV1Test {

    @Autowired
    CallService callService;

    @Test
    void printProxy() {
        log.info("callService class={}", callService.getClass());
    }

    @Test
    void internalCall() {
        callService.internal();
    }

    @Test
    void externalCall() {
        callService.external();
    }

    @TestConfiguration
    static class InternalCallV1TestConfig {
        @Bean
        CallService callService() {
            return new CallService();
        }
    }

    @Slf4j
    static class CallService {

        public void external() {
            log.info("call external");
            printTxInfo();
            internal();
        }

        @Transactional
        public void internal() {
            log.info("call internal");
            printTxInfo();
        }

        private void printTxInfo() {
            boolean txActive = TransactionSynchronizationManager.isActualTransactionActive();
            log.info("tx active={}", txActive);
        }
    }
}
(1) CallService 프록시 객체 생성됐는지 확인
- @Transactional 이 하나라도 있으면 트랜잭션 프록시 객체 생성됨 !
(external()은 없지만, internal()은 있음) - 주입받은 CallService = 프록시 객체

(2) internal() 실행 - 트랜잭션 O

- callService.internal() 호출 ( = 프록시의 internal() )
- 트랜잭션 프록시 호출
- @Transactional 확인 -> 트랜잭션 적용 O
- 트랜잭션 적용 후 실제 CallService 객체의 internal() 호출
- 실제 CallService 객체의 처리 완료 후 트랜잭션 프록시가 트랜잭션 완료
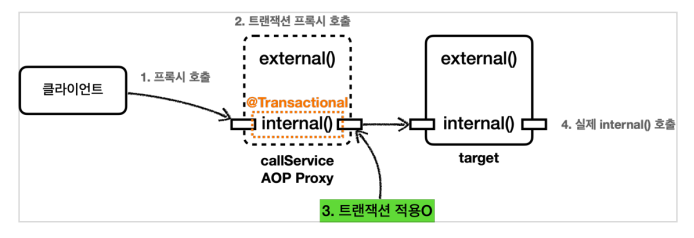
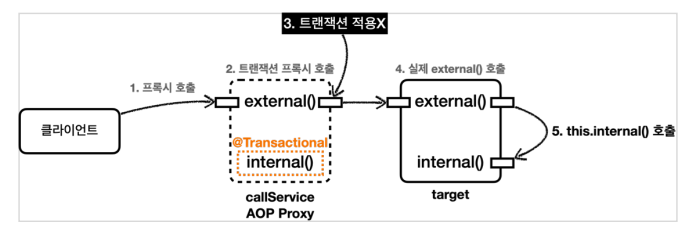
(3) external() 실행 - 트랜잭션 없이, 트랜잭션이 있는 internal() 호출

- callService.external() 호출 ( = 프록시의 external() )
- 트랜잭션 프록시 호출
- @Transactional 없음 -> 트랜잭션 적용 X
- 트랜잭션 적용 없이 실제 CallService 객체의 external() 호출
- external() 은 내부에서 자신의 internal() 호출 (this.internal()) -> 프록시 거치지 않음 -> 트랜잭션 적용 X )
=> @Tansactional을 사용하는 트랜잭션 AOP는 메소드 내부 호출에 프록시를 적용할 수 없음 !
2) 프록시 내부 호출 해결 방법 - 별도의 클래스로 분리
package hello.springtx.apply;

import lombok.RequiredArgsConstructor;
import lombok.extern.slf4j.Slf4j;
import org.junit.jupiter.api.Test;
import org.springframework.beans.factory.annotation.Autowired;
import org.springframework.boot.test.context.SpringBootTest;
import org.springframework.boot.test.context.TestConfiguration;
import org.springframework.context.annotation.Bean;
import org.springframework.transaction.annotation.Transactional;
import org.springframework.transaction.support.TransactionSynchronizationManager;

@Slf4j
@SpringBootTest
public class InternalCallV2Test {

    @Autowired
    CallService callService;

    @Test
    void printProxy() {
        log.info("callService class={}", callService.getClass());
    }

    @Test
    void externalCallV2() {
        callService.external();
    }

    @TestConfiguration
    static class InternalCallV1TestConfig {
        @Bean
        CallService callService() {
            return new CallService(internalService());
        }

        @Bean
        InternalService internalService() {
            return new InternalService();
        }
    }

    @Slf4j
    @RequiredArgsConstructor
    static class CallService {

        private final InternalService internalService;

        public void external() {
            log.info("call external");
            printTxInfo();
            internalService.internal();
        }

        private void printTxInfo() {
            boolean txActive = TransactionSynchronizationManager.isActualTransactionActive();
            log.info("tx active={}", txActive);
        }
    }

    @Slf4j
    static class InternalService {

        @Transactional
        public void internal() {
            log.info("call internal");
            printTxInfo();
        }

        private void printTxInfo() {
            boolean txActive = TransactionSynchronizationManager.isActualTransactionActive();
            log.info("tx active={}", txActive);
        }
    }
}- InternalService 클래스로 분리 -> 메소드 내부 호출을 외부 호출로 변경
- CallService에는 트랜잭션 관련 코드 X -> 트랜잭션 프록시 적용 X
- InternalService에는 트랜잭션 코드 O -> 트랜잭션 프록시 적용 O
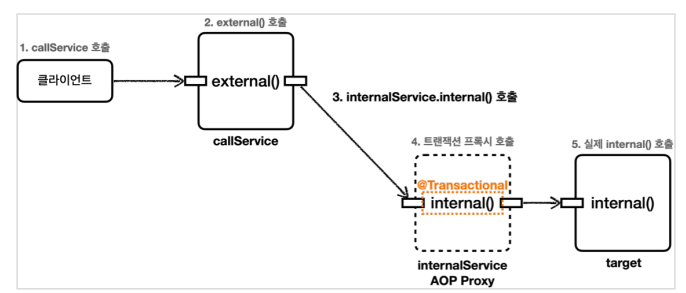
- callService.external() 호출 (실제 callService 객체)
- callService는 주입받은 internalService.internal() 호출
- @Transactional 확인 -> 트랜잭션 프록시 적용 -> 트랜잭션 적용
- 실제 internalService 객체의 internal() 호출

💡 public 메소드만 트랜잭션 적용
스프링 트랜잭션 AOP는 public 메소드에만 트랜잭션 적용하도록 기본 설정
public이 아닌 private, protected, package-visible 등에 @Transactional 붙어있으면 -> 트랜잭션 적용 무시
3-2. 초기화 시점과 트랜잭션 AOP 적용
스프링의 초기화 시점에는 트랜잭션 AOP가 적용되지 않을 수 있음
package hello.springtx.apply;

import jakarta.annotation.PostConstruct;
import lombok.extern.slf4j.Slf4j;
import org.junit.jupiter.api.Test;
import org.springframework.beans.factory.annotation.Autowired;
import org.springframework.boot.context.event.ApplicationReadyEvent;
import org.springframework.boot.test.context.SpringBootTest;
import org.springframework.boot.test.context.TestConfiguration;
import org.springframework.context.annotation.Bean;
import org.springframework.context.event.EventListener;
import org.springframework.transaction.annotation.Transactional;
import org.springframework.transaction.support.TransactionSynchronizationManager;

@SpringBootTest
public class InitTxTest {

    @Autowired
    Hello hello;

    @Test
    void go() {
        // 초기화 코드는 스프링이 초기화 시점에 알아서 호출함
    }

    @TestConfiguration
    static class initTxTestConfig {
        @Bean
        Hello hello() {
            return new Hello();
        }
    }

    @Slf4j
    static class Hello {

        @PostConstruct
        @Transactional
        public void initV1() {
            boolean isActive = TransactionSynchronizationManager.isActualTransactionActive();
            log.info("Hello init @PostConstruct tx active={}", isActive);
        }

        @EventListener(value = ApplicationReadyEvent.class)
        @Transactional
        public void initV2() {
            boolean isActive = TransactionSynchronizationManager.isActualTransactionActive();
            log.info("Hello init ApplicationReadyEvent tx active={}", isActive);
        }

    }
}
(1) @PostConstruct + @Transactional => 트랜잭션 적용 X

초기화 코드 먼저 호출 -> 그 다음에 트랜잭션 AOP 적용
-> 초기화 시점에는 트랜잭션을 획득할 수 X
(2) @EvnetListener(value = ApplicationReadyEvent.class) 사용

스프링이 컨테이너를 완전히 생성한 후 -> 이벤트가 붙은 메소드 호출
-> 트랜잭션 적용 O
4. 예외와 트랜잭션 커밋, 롤백
4-1. 예외와 트랜잭션 커밋, 롤백
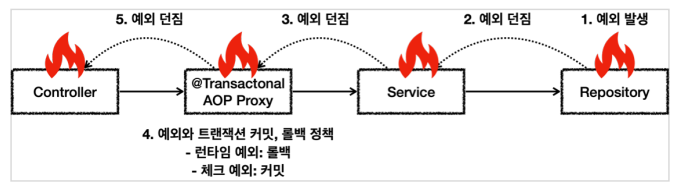
예외 발생 시, 내부에서 예외 처리 못하고, 트랜잭션 범위 밖으로 예외를 던질 때
스프링 트랜잭션 AOP는 예외의 종류에 따라 트랜잭션 커밋 or 롤백
- 런타임 예외 -> 트랜잭션 롤백
- 체크 예외 -> 트랜잭션 커밋
- 정상 -> 트랜잭션 커밋
1) 예외에 따른 트랜잭션 커밋, 롤백 테스트
package hello.springtx.exception;

import lombok.extern.slf4j.Slf4j;
import org.assertj.core.api.Assertions;
import org.junit.jupiter.api.Test;
import org.springframework.beans.factory.annotation.Autowired;
import org.springframework.boot.test.context.SpringBootTest;
import org.springframework.boot.test.context.TestConfiguration;
import org.springframework.context.annotation.Bean;
import org.springframework.transaction.annotation.Transactional;

import static org.assertj.core.api.Assertions.*;

@SpringBootTest
public class RollbackTest {

    @Autowired
    RollbackService service;

    @Test
    void runtimeException() {
        assertThatThrownBy(() -> service.runtimeException())
                .isInstanceOf(RuntimeException.class);
    }

    @Test
    void checkedException() {
        assertThatThrownBy(() -> service.checkedException())
                .isInstanceOf(MyException.class);
    }

    @Test
    void rollbackFor() {
        assertThatThrownBy(() -> service.rollbackFor())
                .isInstanceOf(MyException.class);
    }

    @TestConfiguration
    static class RollbackTestConfig {
        @Bean
        RollbackService rollbackService() {
            return new RollbackService();
        }
    }

    @Slf4j
    static class RollbackService {

        // 런타임 예외 발생 -> 롤백
        @Transactional
        public void runtimeException() {
            log.info("call runtimeException");
            throw new RuntimeException();
        }

        // 체크 예외 발생 -> 커밋
        @Transactional
        public void checkedException() throws MyException {
            log.info("call checkedException");
            throw new MyException();
        }

        // 체크 예외 rollbackFor 지정 -> 롤백
        @Transactional(rollbackFor = MyException.class)
        public void rollbackFor() throws MyException {
            log.info("call rollbackFor");
            throw new MyException();
        }
    }

    static class MyException extends Exception {
    }
}
(1) 트랜잭션 확인 로그 추가
logging.level.org.springframework.transaction.interceptor=TRACE
logging.level.org.springframework.jdbc.datasource.DataSourceTransactionManager=DEBUG
#JPA log
logging.level.org.springframework.orm.jpa.JpaTransactionManager=DEBUG
logging.level.org.hibernate.resource.transaction=DEBUG
(2) 런타임 예외 -> 시스템 예외 -> 롤백
- 예) 복구할 수 없는 시스템 예외 -> 롤백

(3) 체크 예외 -> 비즈니스 예외 -> 커밋
- 예) 비즈니스 의미가 있는 비즈니스 예외 -> 주문 시 잔고 부족 -> 일단 데이터 저장 후 커밋

(4) 체크 예외 rollbackFor 지정 -> 롤백
- 원래 체크 예외는 커밋인데, 롤백 하고 싶으면 지정 가능

4-2. 활용
* 비즈니스 요구사항
- 정상 : 데이터 저장, 결제 상태 = "완료" -> 커밋
- 시스템 예외 : 복구 불가능한 시스템 예외 -> 런타임 예외 -> 롤백
- 비즈니스 예외 : 데이터 저장, 결제 상태 = "대기" -> 체크 예외 -> 커밋
1) NotEnoughMoneyException - 잔고 부족 비즈니스 예외 (체크 예외)
package hello.springtx.order;

public class NotEnoughMoneyException extends Exception {

    public NotEnoughMoneyException(String message) {
        super(message);
    }
}
2) Order
package hello.springtx.order;

import jakarta.persistence.Entity;
import jakarta.persistence.GeneratedValue;
import jakarta.persistence.Id;
import jakarta.persistence.Table;
import lombok.Getter;
import lombok.Setter;

@Entity
@Table(name = "orders")
@Getter
@Setter
public class Order {

    @Id
    @GeneratedValue
    private Long id;

    private String username;    // 정상, 예외, 잔고부족
    private String payStatus;   // 대기, 완료
}- JPA를 사용하는 Order 엔티티
- ( * 실무에서 엔티티에 @Setter 사용 비추 )
- 테이블 이름 지정하지 않으면 클래스 이름인 order가 되지만, 데이터베이스 예약어(order by) 때문에 사용할 수 X -> orders라고 따로 지정
3) OrderRepository - 스프링 데이터 JPA 사용 (기본 CRUD)
package hello.springtx.order;

import org.springframework.data.jpa.repository.JpaRepository;

public interface OrderRepository extends JpaRepository<Order, Long> {
}
4) OrderService
package hello.springtx.order;
import lombok.RequiredArgsConstructor;
import lombok.extern.slf4j.Slf4j;
import org.springframework.stereotype.Service;
import org.springframework.transaction.annotation.Transactional;
@Slf4j
@Service
@RequiredArgsConstructor
public class OrderService {
private final OrderRepository orderRepository;
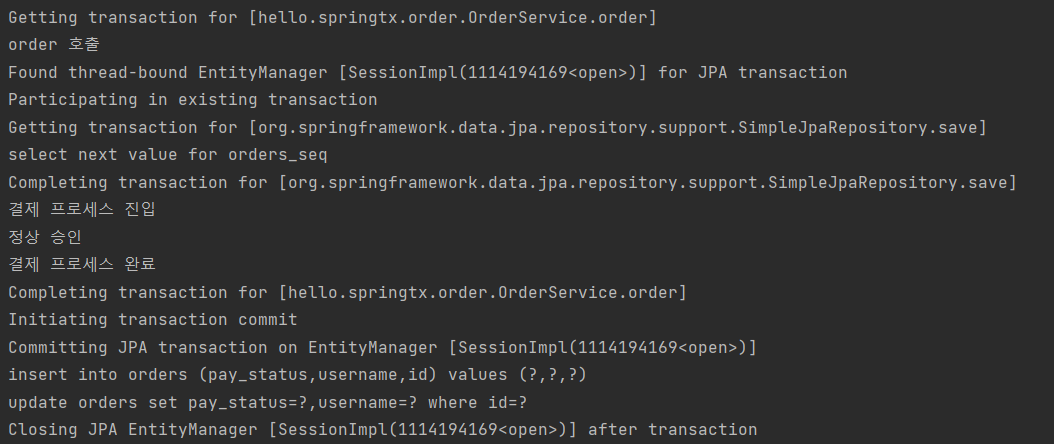
// JPA는 트랜잭션 커밋 시점에 Order 데이터를 DB에 반영한다.
@Transactional
public void order(Order order) throws NotEnoughMoneyException {
log.info("order 호출");
orderRepository.save(order);
log.info("결제 프로세스 진입");
if (order.getUsername().equals("예외")) {
log.info("시스템 예외 발생");
throw new RuntimeException("시스템 예외");
} else if (order.getUsername().equals("잔고부족")) {
log.info("잔고 부족 비즈니스 예외 발생");
order.setPayStatus("대기");
throw new NotEnoughMoneyException("잔고가 부족합니다");
} else {
log.info("정상 승인");
order.setPayStatus("완료");
}
log.info("결제 프로세스 완료");
}
}- 사용자 이름 = "예외"
- 시스템 예외 -> 런타임 예외 발생 -> 롤백
- 시스템 예외 -> 런타임 예외 발생 -> 롤백
- 사용자 이름 = "잔고부족"
- 비즈니스 예외 -> 체크 예외 발생 -> 커밋
- 비즈니스 예외 -> 체크 예외 발생 -> 커밋
- 사용자 이름 = 그 외
- 정상 -> 커밋
5) OrderServiceTest
package hello.springtx.order;

import lombok.extern.slf4j.Slf4j;
import org.assertj.core.api.Assertions;
import org.junit.jupiter.api.Test;
import org.springframework.beans.factory.annotation.Autowired;
import org.springframework.boot.test.context.SpringBootTest;

import java.util.Optional;

import static org.assertj.core.api.Assertions.*;
import static org.junit.jupiter.api.Assertions.*;

@Slf4j
@SpringBootTest
class OrderServiceTest {

    @Autowired
    OrderService orderService;
    @Autowired
    OrderRepository orderRepository;

    @Test
    void complete() throws NotEnoughMoneyException {
        // given
        Order order = new Order();
        order.setUsername("정상");

        // when
        orderService.order(order);

        // then
        Order findOrder = orderRepository.findById(order.getId()).get();
        assertThat(findOrder.getPayStatus()).isEqualTo("완료");
    }

    @Test
    void runtimeException() throws NotEnoughMoneyException {
        // given
        Order order = new Order();
        order.setUsername("예외");

        // when
        assertThatThrownBy(() -> orderService.order(order))
                .isInstanceOf(RuntimeException.class);

        // then (시스템 예외 -> 롤백 -> 데이터가 없어야 함)
        Optional<Order> orderOptional = orderRepository.findById(order.getId());
        assertThat(orderOptional.isEmpty()).isTrue();
    }

    @Test
    void bizException() {
        // given
        Order order = new Order();
        order.setUsername("잔고부족");

        // when
        try {
            orderService.order(order);
        } catch (NotEnoughMoneyException e) {
            log.info("고객에게 잔고 부족을 알리고 별도의 계좌로 입금하도록 안내");
        }

        // then
        Order findOrder = orderRepository.findById(order.getId()).get();
        assertThat(findOrder.getPayStatus()).isEqualTo("대기");
    }

}
(1) JPA SQL 확인 로그 추가
#JPA SQL
logging.level.org.hibernate.SQL=DEBUG
(2) complete() -> 정상 -> 커밋
- 커밋 시점에 데이터 insert, update
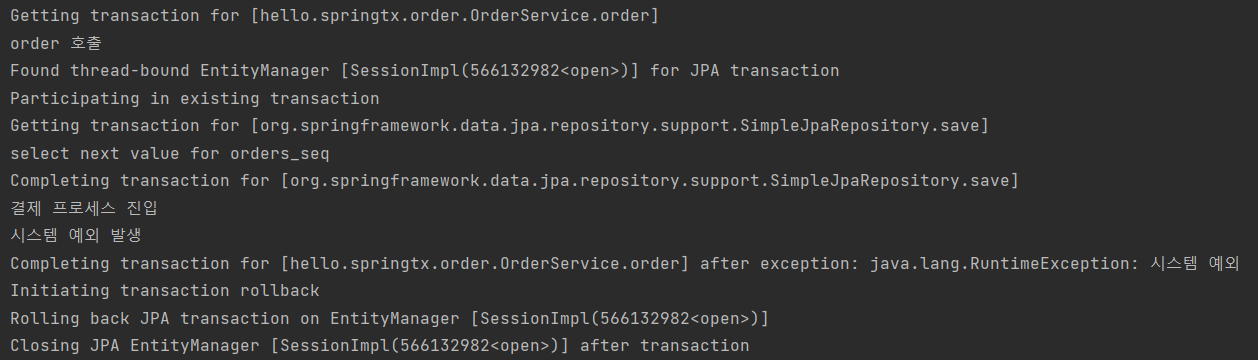
(3) runtimeException() -> 시스템 예외 -> 롤백
- 롤백이니까 insert 수행할 필요도 X
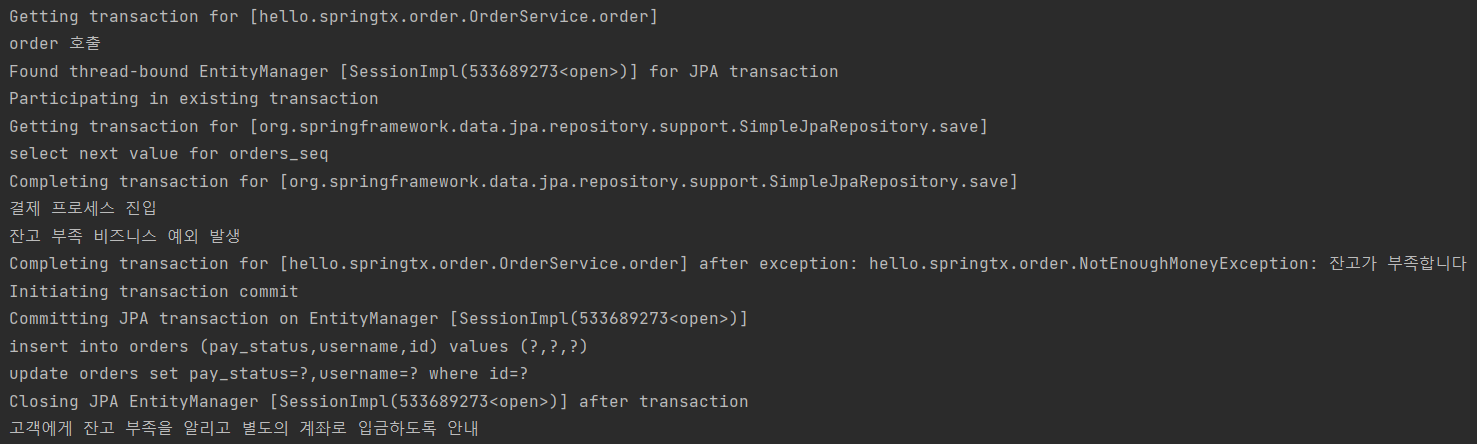
(4) bixException() -> 비즈니스 예외 -> 커밋
- 체크 예외 -> 커밋 수행 -> 데이터 insert, update 완
- 체크 예외인데 롤백하고 싶으면 -> rollbackFor 옵션 사용