📌 테스트의 중요한 원칙
- 테스트는 다른 테스트와 격리해야 함 (격리성)
- 테스트는 반복해서 실행할 수 있어야 함
1. 서버와 테스트의 데이터베이스 분리
로컬에서 사용하는 애플리케이션 서버와 테스트가 같은 데이터베이스 사용하면 X
-> 데이터베이스에 이미 로컬에서 저장한 데이터들이 저장되어 있어서 테스트 제대로 수행 X
-> 서버와 테스트의 데이터베이스 분리 ( 테스트는 격리성 보장되어있어야 함 ! )
- local에서 접근하는 서버 전용 데이터베이스 : jdbc:h2:tcp://localhost/~/test
- test 케이스에서 접근하는 전용 데이터베이스 : jdbc:h2:tcp://localhost/~/testcase
1) testcase 데이터베이스에서 item 테이블 생성 후 접속 정보 변경
* test / application.properties
spring.profiles.active=test
spring.datasource.url=jdbc:h2:tcp://localhost/~/testcase
spring.datasource.username=sa
spring.datasource.password=

#jdbcTemplate sql log
logging.level.org.springframework.jdbc=debug
참고) main / application.properties
spring.profiles.active=local
spring.datasource.url=jdbc:h2:tcp://localhost/~/test
spring.datasource.username=sa
spring.datasource.password=

#jdbcTemplate sql log
logging.level.org.springframework.jdbc=debug
2. 테스트 - 데이터베이스 연동
* ItemRepositoryTest
@SpringBootTest
class ItemRepositoryTest {}
* ItemServiceApplication
@Slf4j
@Import(JdbcTemplateV3Config.class)
@SpringBootApplication(scanBasePackages = "hello.itemservice.web")
public class ItemServiceApplication {}
- @SpringBootTest는 @SpringBootApplication을 찾아서 설정으로 사용함
- @SpringBootApplication 설정이 MemoryConfig -> JdbcTemplateV3Config 로 변경
-> 테스트도 JdbcTemplateV3Config 설정을 사용 -> JdbcTemplate 을 통해 데이터베이스 호출
3. 테스트 - 트랜잭션과 롤백
테스트 끝난 후 데이터 삭제 시
delete로 삭제 -> 중간에 테스트가 실패해서 종료되면 delete가 안될 수도 있음
-> 커밋하지 않고 트랜잭션 롤백 -> 데이터 제거
* 순서 : 트랜잭션 시작 -> 테스트 실행 -> 트랜잭션 롤백

트랜잭션 시작 -> 트랜잭션 동기화 매니저에서 커넥션 공유
1) 트랜잭션 직접 추가
@SpringBootTest
class ItemRepositoryTest {

    @Autowired
    ItemRepository itemRepository;

    // 트랜잭션 관련 코드
    @Autowired
    PlatformTransactionManager transactionManager;
    TransactionStatus status;

    @BeforeEach
    void beforeEach() {
        // 트랜잭션 시작
        status = transactionManager.getTransaction(new DefaultTransactionDefinition());
    }

    @AfterEach
    void afterEach() {
        //MemoryItemRepository 의 경우 제한적으로 사용
        if (itemRepository instanceof MemoryItemRepository) {
            ((MemoryItemRepository) itemRepository).clearStore();
        }

        // 트랜잭션 롤백
        transactionManager.rollback(status);
}- PlatformTransactionManager를 주입 받아서 사용
스프링 부트가 적절한 트랜잭션 매니저를 알아서 찾아서 스프링 빈으로 등록해준다는 점 ! - @BeforeEach
- 각 테스트 케이스 실행 전마다 호출
- 트랜잭션 시작 -> 각 테스트를 트랜잭션 범위 안에서 실행
- @AfterEach
- 각 테스트 케이스가 완료된 후마다 호출
- 트랜잭션 롤백
2) @Transactional로 자동 트랜잭션 적용
(1) @Transactional로 자동 트랜잭션, 롤백
@Transactional
@SpringBootTest
class ItemRepositoryTest {

    @Autowired
    ItemRepository itemRepository;
* 테스트 케이스에서의 @Transactional 작동 원리
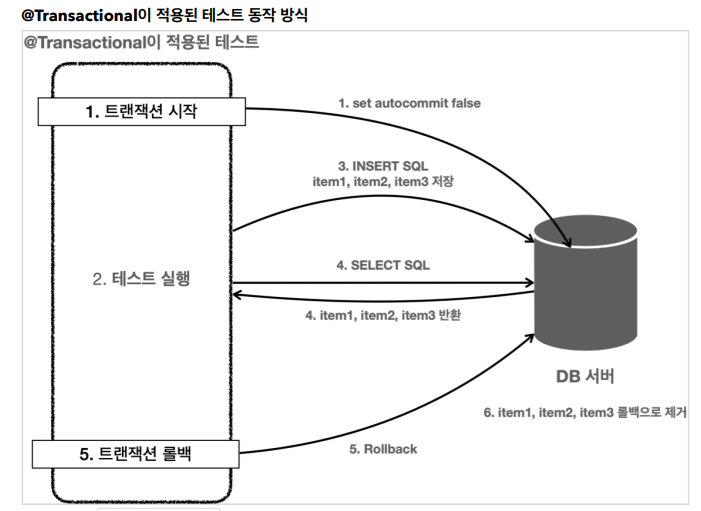
- 원래 @Transactional : 로직이 성공적으로 수행되면 자동 커밋
- 테스트에서의 @Transactional : 테스트를 트랜잭션 안에서 실행, 테스트 끝나면 트랜잭션 자동 롤백 (커밋 X) !!
- @Transactional 적용 -> 트랜잭션 시작
- 테스트 로직 실행 -> 모든 로직은 트랜잭션 안에서 수행
- 테스트 -> 리포지토리 호출 -> JdbcTemplate 사용 -> 데이터베이스 접근
- DB 작업 수행
- 테스트 끝나면 -> 트랜잭션 강제 롤백
- 롤백에 의해 데이터 제거
- ( 테스트 실행 중에 테스트가 강제로 종료되어도 커밋하지 않기 때문에 데이터 자동 롤백 )
참고
- 테스트 케이스의 메소드나 클래스에 @Transactional을 직접 붙여서 사용할때만 이렇게 동작
- 트랜잭션을 테스트에서 시작 -> 서비스, 리포지토리에 있는 @Transactional도 이 트랜잭션에 참여 !
( -> 테스트 실행이 종료될 때까지 테스트가 실행하는 모든 코드가 같은 트랜잭션 범위에 들어감)
(2) @Commit 강제 커밋
@Transactional을 테스트에서 사용하면 테스트가 끝나고 롤백 -> 데이터가 모두 사라짐
근데, 데이터가 잘 저장되었는지 확인하고 싶을 때 -> @Commit 강제 커밋 적용 ( or @Rollback(value = false) )
* 예) save() 시 저장되었는지 확인하기
@Test
@Commit
@Transactional
void save() {
    //given
    Item item = new Item("itemA", 10000, 10);

    //when
    Item savedItem = itemRepository.save(item);

    //then
    Item findItem = itemRepository.findById(item.getId()).get();
    assertThat(findItem).isEqualTo(savedItem);
}
4. 테스트 - 임베디드 모드 DB
테스트용 데이터베이스 운영 -> 번잡함 + 단순한 테스트 검증 용도는 테스트 후 DB를 제거해도 됨
* 임베디드 모드
H2 데이터베이스는 자바로 개발되어 있고, JVM 안에서 메모리 모드로 동작하는 특별한 기능 제공
-> 애플리케이션을 실행할 때 JVM 메모리에 H2 데이터베이스 포함해서 실행할 수 있음
-> DB를 애플리케이션에 내장해서 함께 실행 (임베디드 모드)
1) 임베디드 모드 직접 사용
(1) 테스트용 데이터소스 추가
* ItemServiceApplication
package hello.itemservice;

import hello.itemservice.config.*;
import hello.itemservice.repository.ItemRepository;
import lombok.extern.slf4j.Slf4j;
import org.springframework.boot.SpringApplication;
import org.springframework.boot.autoconfigure.SpringBootApplication;
import org.springframework.context.annotation.Bean;
import org.springframework.context.annotation.Import;
import org.springframework.context.annotation.Profile;
import org.springframework.jdbc.datasource.DriverManagerDataSource;

import javax.sql.DataSource;

@Slf4j
@Import(JdbcTemplateV3Config.class)
@SpringBootApplication(scanBasePackages = "hello.itemservice.web")
public class ItemServiceApplication {

	public static void main(String[] args) {
		SpringApplication.run(ItemServiceApplication.class, args);
	}

	@Bean
	@Profile("local")
	public TestDataInit testDataInit(ItemRepository itemRepository) {
		return new TestDataInit(itemRepository);
	}

	@Bean
	@Profile("test")
	public DataSource dataSource() {
		log.info("메모리 데이터베이스 초기화");
		DriverManagerDataSource dataSource = new DriverManagerDataSource();
		dataSource.setDriverClassName("org.h2.Driver");	// h2 데이터베이스 드라이버
		dataSource.setUrl("jdbc:h2:mem:db;DB_CLOSE_DELAY=-1");
		dataSource.setUsername("sa");
		dataSource.setPassword("");
		return dataSource;
	}
}- h2 데이터베이스 서버 종료
- @Profile("test")
- 프로필이 test인 경우에만 데이터소스를 스프링 빈으로 등록
- 테스트 케이스에서만 이 데이터소스를 스프링 빈으로 등록해서 사용
- dataSource()
- jdbc:h2:mem:db : 임베디드 모드(메모리 모드)로 동작하는 h2 데이터베이스 사용
- DB_CLOSE_DELAY=-1 : 데이터베이스 커넥션 연결이 모두 끊어지면 데이터베이스도 종료되는 것 방지
- 이 데이터소스를 사용하면 메모리 DB 사용
(2) 스프링 부트 제공 - 기본 SQL 스크립트를 사용해서 데이터베이스 초기화
메모리 DB는 애플리케이션이 종료될 때 함께 사라짐 -> 애플리케이션 실행 시점에 데이터베이스 테이블도 새로 생성해야 함
스프링 부트는 SQL 스크립트를 실행해서 애플리케이션 로딩 시점에 데이터베이스를 초기화하는 기능 제공
* test / resources / schema.sql (규약 - 파일 이름도 이대로 해야함)
drop table if exists item CASCADE;
create table item
(
    id bigint generated by default as identity,
    item_name varchar(10),
    price integer,
    quantity integer,
    primary key (id)
);
(3) 실행
대충 이런 로그 ~~

2) (📌최종) 스프링 부트 - 임베디드 모드 데이터베이스 테스트
- 스프링 부트는 데이터베이스에 대한 별다른 설정이 없으면 임베디드 데이터베이스 사용
- 메모리용 DB (in memory 임베디드 모드) 데이터베이스에 접근하는 데이터소스 설정 X
-> 임베디드 모드로 접근하는 데이터소스를 만들어서 제공 (위에서 만든 데이터소스와 비슷)
- 메모리용 DB (in memory 임베디드 모드) 데이터베이스에 접근하는 데이터소스 설정 X
(1) test / application.properties
- 데이터 소스 설정 제거
spring.profiles.active=test

#jdbcTemplate sql log
logging.level.org.springframework.jdbc=debug
(2) Application
- 데이터 소스 설정 제거
package hello.itemservice;

import hello.itemservice.config.*;
import hello.itemservice.repository.ItemRepository;
import lombok.extern.slf4j.Slf4j;
import org.springframework.boot.SpringApplication;
import org.springframework.boot.autoconfigure.SpringBootApplication;
import org.springframework.context.annotation.Bean;
import org.springframework.context.annotation.Import;
import org.springframework.context.annotation.Profile;
import org.springframework.jdbc.datasource.DriverManagerDataSource;

import javax.sql.DataSource;

@Slf4j
@Import(JdbcTemplateV3Config.class)
@SpringBootApplication(scanBasePackages = "hello.itemservice.web")
public class ItemServiceApplication {

	public static void main(String[] args) {
		SpringApplication.run(ItemServiceApplication.class, args);
	}

	@Bean
	@Profile("local")
	public TestDataInit testDataInit(ItemRepository itemRepository) {
		return new TestDataInit(itemRepository);
	}

}
(3) test / resources / schema.sql
- 임베디드 데이터베이스에서 사용하기 위한 테이블 생성 SQL 스크립트 (데이터베이스 초기화)
drop table if exists item CASCADE;
create table item
(
    id bigint generated by default as identity,
    item_name varchar(10),
    price integer,
    quantity integer,
    primary key (id)
);
(4) RepositoryTest
- @Transactional 만 붙임 -> 트랜잭션 실행, 트랜잭션 롤백
package hello.itemservice.domain;

import hello.itemservice.repository.ItemRepository;
import hello.itemservice.repository.ItemSearchCond;
import hello.itemservice.repository.ItemUpdateDto;
import hello.itemservice.repository.memory.MemoryItemRepository;
import org.junit.jupiter.api.AfterEach;
import org.junit.jupiter.api.BeforeEach;
import org.junit.jupiter.api.Test;
import org.springframework.beans.factory.annotation.Autowired;
import org.springframework.boot.test.context.SpringBootTest;
import org.springframework.transaction.PlatformTransactionManager;
import org.springframework.transaction.TransactionStatus;
import org.springframework.transaction.annotation.Transactional;
import org.springframework.transaction.support.DefaultTransactionDefinition;

import java.util.List;

import static org.assertj.core.api.Assertions.assertThat;

@Transactional
@SpringBootTest
class ItemRepositoryTest {

    @Autowired
    ItemRepository itemRepository;

    @Test
    void save() {
        //given
        Item item = new Item("itemA", 10000, 10);

        //when
        Item savedItem = itemRepository.save(item);

        //then
        Item findItem = itemRepository.findById(item.getId()).get();
        assertThat(findItem).isEqualTo(savedItem);
    }

    @Test
    void updateItem() {
        //given
        Item item = new Item("item1", 10000, 10);
        Item savedItem = itemRepository.save(item);
        Long itemId = savedItem.getId();

        //when
        ItemUpdateDto updateParam = new ItemUpdateDto("item2", 20000, 30);
        itemRepository.update(itemId, updateParam);

        //then
        Item findItem = itemRepository.findById(itemId).get();
        assertThat(findItem.getItemName()).isEqualTo(updateParam.getItemName());
        assertThat(findItem.getPrice()).isEqualTo(updateParam.getPrice());
        assertThat(findItem.getQuantity()).isEqualTo(updateParam.getQuantity());
    }

    @Test
    void findItems() {
        //given
        Item item1 = new Item("itemA-1", 10000, 10);
        Item item2 = new Item("itemA-2", 20000, 20);
        Item item3 = new Item("itemB-1", 30000, 30);

        itemRepository.save(item1);
        itemRepository.save(item2);
        itemRepository.save(item3);

        //둘 다 없음 검증
        test(null, null, item1, item2, item3);
        test("", null, item1, item2, item3);

        //itemName 검증
        test("itemA", null, item1, item2);
        test("temA", null, item1, item2);
        test("itemB", null, item3);

        //maxPrice 검증
        test(null, 10000, item1);

        //둘 다 있음 검증
        test("itemA", 10000, item1);
    }

    void test(String itemName, Integer maxPrice, Item... items) {
        List<Item> result = itemRepository.findAll(new ItemSearchCond(itemName, maxPrice));
        assertThat(result).containsExactly(items);
    }
}


jdbc:h2:mem ~ 임의의 데이터베이스 이름
-> 여러 데이터소스가 사용될 때 같은 데이터베이스를 사용하면서 발생하는 충돌 방지
* 임베디드 데이터베이스 이름을 스프링 부트가 기본으로 제공하는 jdbc:h2:mem:testdb 으로 고정하고 싶을 때
spring.datasource.generate-unique-name=false
'Spring' 카테고리의 다른 글
| [인프런/스프링 DB 2편] 4. 데이터 접근 기술 (3) JPA (0) | 2023.07.10 |
|---|---|
| [인프런/스프링 DB 2편] 4. 데이터 접근 기술 (2) MyBatis (0) | 2023.07.06 |
| [인프런/스프링 DB 2편] 2. 데이터 접근 기술 (1) JdbcTemplate (0) | 2023.06.28 |
| [인프런/스프링 DB 2편] 1. 데이터 접근 기술 (0) | 2023.06.28 |
| [인프런/스프링 DB 1편] 6. 스프링과 문제 해결 - 예외 처리, 반복 (0) | 2023.06.26 |