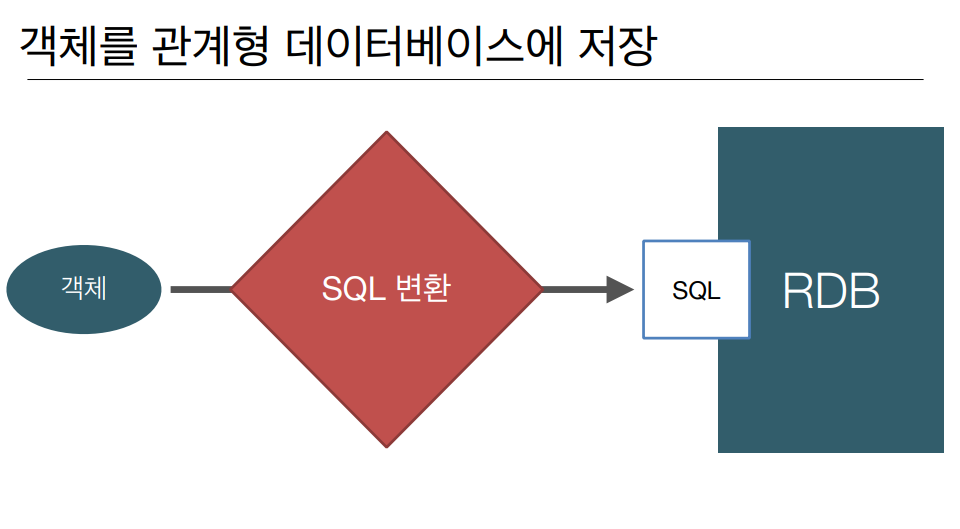
1. SQL 매퍼 기술의 문제점
1) SQL 의존적
- 개발자가 SQL로 직접 변환 -> CRUD 코드의 반복 작성
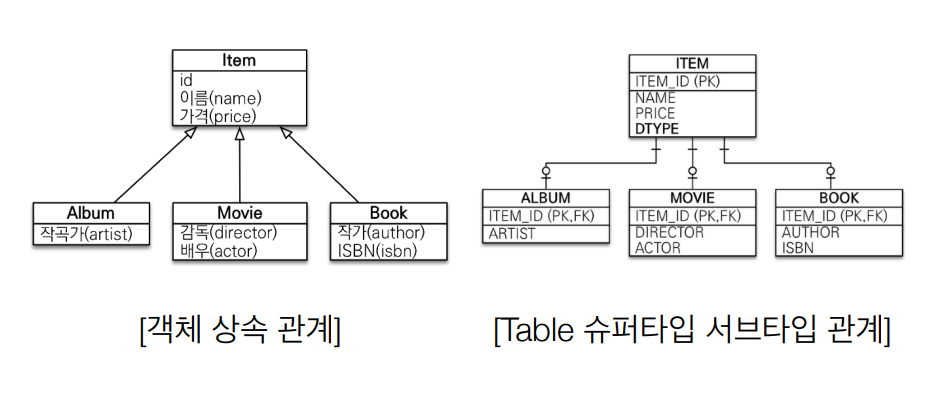
2) 패러다임 불일치 - 객체 vs 관계형 데이터베이스
- 두 객체가 상속관계일 때, 두 객체에 각각 INSERT 등을 수행해야 함
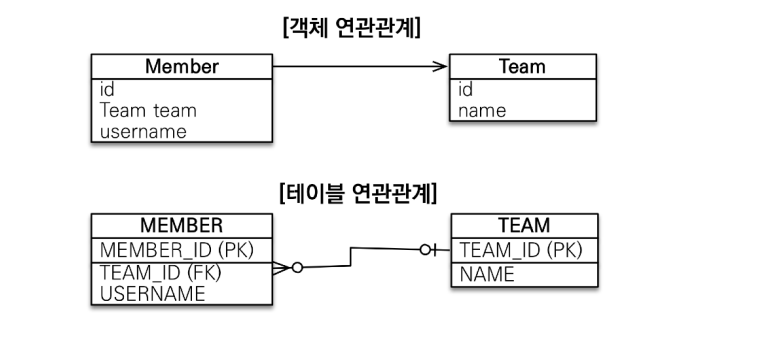
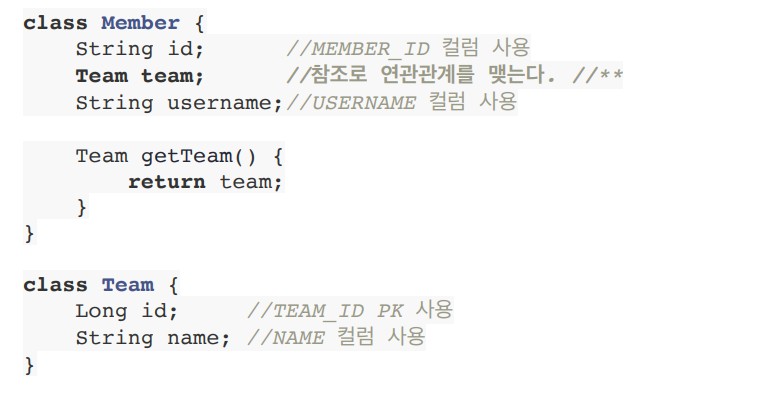
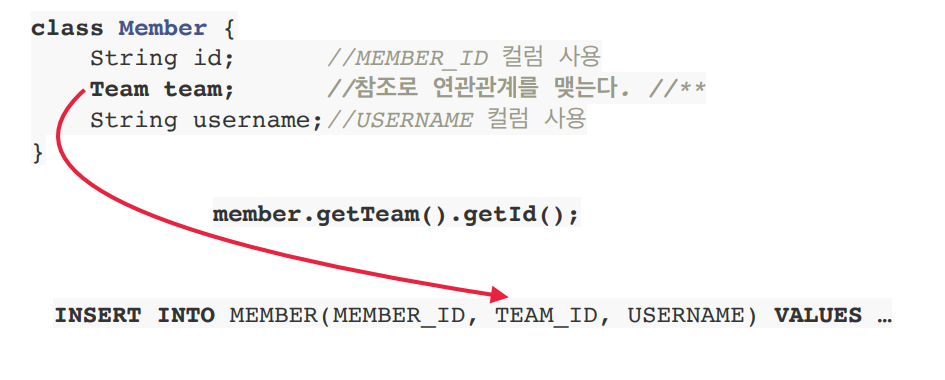
- Member 객체와 Team 객체가 연관관계에 있을 때
객체는 참조를 사용 (member.getTeam()), 테이블을 외래키 사용 (JOIN ON M.TEAM_ID = T.TEAM_ID)
-> 객체를 테이블에 맞추어 모델링할 때
-> 객체다운 모델링을 할 때
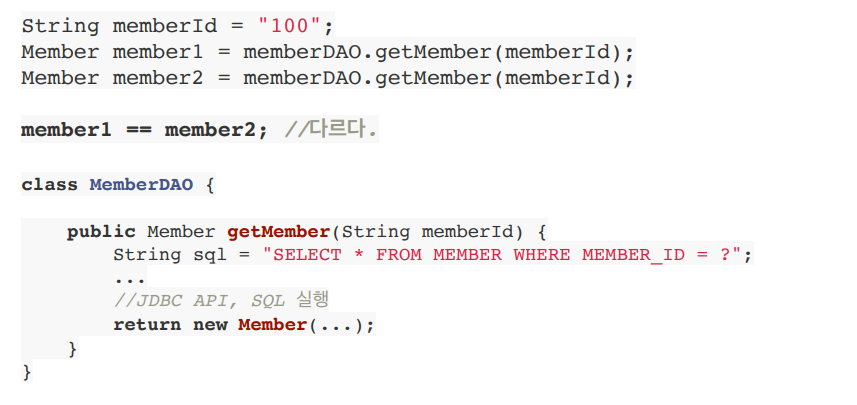
- DB에서 아이디를 통해 조회한 Member 객체 2개는 서로 다르다
2. JPA (Java Persistence API)
자바 진영의 ORM 기술 표준
ORM (Object-Relational Mapping 객체 관계 매핑)
- 객체는 객체대로, 관계형 데이터베이스는 관계형 데이터베이스대로 설계
- ORM 프레임워크가 중간에서 매핑
- 대중적인 언어에는 대부분 ORM 기술이 존재
1) 자바 애플리케이션과 JDBC 사이에서 동작
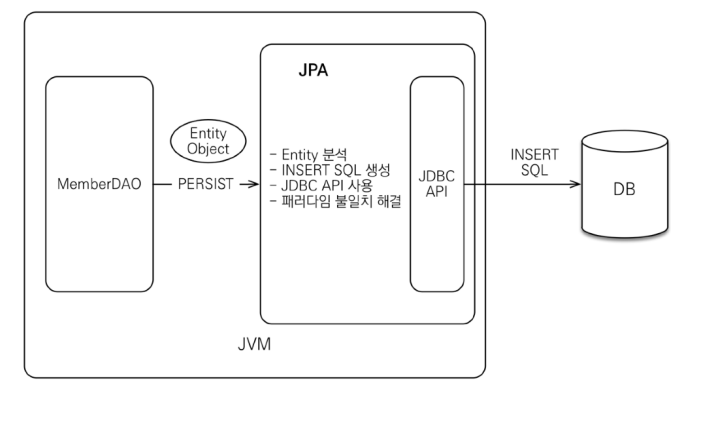
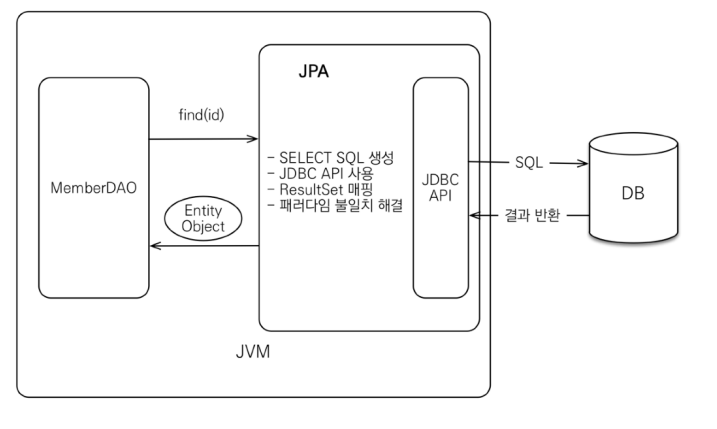
2) SQL 중심 개발 -> 객체 중심으로 개발
- 개발자가 SQL 직접 작성 X
- SQL 매퍼 사용의 단점 해결
- 생산성, 유지보수성, 성능 최적화 등
3. JPA 적용
1) build.gradle
plugins {
	id 'org.springframework.boot' version '2.6.5'
	id 'io.spring.dependency-management' version '1.0.11.RELEASE'
	id 'java'
}

group = 'com.example'
version = '0.0.1-SNAPSHOT'
sourceCompatibility = '11'

configurations {
	compileOnly {
		extendsFrom annotationProcessor
	}
}

repositories {
	mavenCentral()
}

dependencies {
	implementation 'org.springframework.boot:spring-boot-starter-thymeleaf'
	implementation 'org.springframework.boot:spring-boot-starter-web'

	//JdbcTemplate 추가
//	implementation 'org.springframework.boot:spring-boot-starter-jdbc'
	//MyBatis 추가
	implementation 'org.mybatis.spring.boot:mybatis-spring-boot-starter:2.2.0'
	//JPA, 스프링 데이터 JPA 추가
	implementation 'org.springframework.boot:spring-boot-starter-data-jpa'

	//H2 데이터베이스 추가
	runtimeOnly 'com.h2database:h2'

	compileOnly 'org.projectlombok:lombok'
	annotationProcessor 'org.projectlombok:lombok'
	testImplementation 'org.springframework.boot:spring-boot-starter-test'

	//테스트에서 lombok 사용
	testCompileOnly 'org.projectlombok:lombok'
	testAnnotationProcessor 'org.projectlombok:lombok'
}

tasks.named('test') {
	useJUnitPlatform()
}
2) main, test - application.properties
spring.profiles.active=local
spring.datasource.url=jdbc:h2:tcp://localhost/~/test
spring.datasource.username=sa
spring.datasource.password=

#jdbcTemplate sql log
logging.level.org.springframework.jdbc=debug

#MyBatis
mybatis.type-aliases-package=hello.itemservice.domain
mybatis.configuration.map-underscore-to-camel-case=true
logging.level.hello.itemservice.repository.mybatis=trace

#JPA log
logging.level.org.hibernate.SQL=DEBUG
logging.level.org.hibernate.type.descriptor.sql.BasicBinder=TRACE- org.higernate.SQL=DEBUG : 하이버네이트가 생성하고 실행하는 SQL 확인
- org.hibernate.type.descriptor.sql.BasicBinder=TRACE : SQL에 바인딩되는 파라미터 확인
3) Item 객체 - ORM 매핑
package hello.itemservice.domain;

import lombok.Data;

import javax.persistence.*;

@Data
@Entity
public class Item {

    @Id @GeneratedValue(strategy = GenerationType.IDENTITY)
    private Long id;

    @Column(name = "item_name", length = 10)
    private String itemName;
    private Integer price;
    private Integer quantity;

    public Item() {
    }

    public Item(String itemName, Integer price, Integer quantity) {
        this.itemName = itemName;
        this.price = price;
        this.quantity = quantity;
    }
}- @Entity : JPA가 사용하는 객체라는 뜻. 이 어노테이션이 있어야 JPA가 인식 가능
- @Id : 테이블의 PK와 해당 필드 매핑
- @GeneratedValue(strategy = GenerationType.IDENTITY) : PK 생성 값을 데이터베이스에서 생성하는 IDENTITY 방식 사용
- @Column : 객체의 필드를 테이블의 컬럼과 매핑
- name = "item_name" : 객체는 itemName, 테이블의 컬럼은 item_name이므로 이렇게 지정 (생략해도 됨)
- length = 10 : JPA 매핑 정보로 DDL(create table)도 생성할 수 있는데, 그 때 컬럼의 길이 값으로 활용
- @Column을 생략할 경우 필드의 이름을 테이블의 컬럼 이름으로 사용함.
-> 스프링 부트와 통합해서 사용할 경우, 객체 필드의 카멜 케이스를 테이블 컬럼의 언더스코어로 자동 변환
(itemName -> item_name)
- JPA는 기본 생성자 필수
4) JpaItemRepository
package hello.itemservice.repository.jpa;

import hello.itemservice.domain.Item;
import hello.itemservice.repository.ItemRepository;
import hello.itemservice.repository.ItemSearchCond;
import hello.itemservice.repository.ItemUpdateDto;
import lombok.extern.slf4j.Slf4j;
import org.springframework.stereotype.Repository;
import org.springframework.transaction.annotation.Transactional;
import org.springframework.util.StringUtils;

import javax.persistence.EntityManager;
import javax.persistence.TypedQuery;
import java.util.List;
import java.util.Optional;

@Slf4j
@Repository
@Transactional
public class JpaItemRepository implements ItemRepository {

    private final EntityManager em;

    public JpaItemRepository(EntityManager em) {
        this.em = em;
    }

    @Override
    public Item save(Item item) {
        em.persist(item);
        return item;
    }

    @Override
    public void update(Long itemId, ItemUpdateDto updateParam) {
        Item findItem = em.find(Item.class, itemId);
        findItem.setItemName(updateParam.getItemName());
        findItem.setPrice(updateParam.getPrice());
        findItem.setQuantity(updateParam.getQuantity());
    }

    @Override
    public Optional<Item> findById(Long id) {
        Item item = em.find(Item.class, id);
        return Optional.ofNullable(item);
    }

    @Override
    public List<Item> findAll(ItemSearchCond cond) {
        String jpql = "select i from Item i";

        Integer maxPrice = cond.getMaxPrice();
        String itemName = cond.getItemName();
        if (StringUtils.hasText(itemName) || maxPrice != null) {
            jpql += " where";
        }
        boolean andFlag = false;
        if (StringUtils.hasText(itemName)) {
            jpql += " i.itemName like concat('%',:itemName,'%')";
            andFlag = true;
        }
        if (maxPrice != null) {
            if (andFlag) {
                jpql += " and";
            }
            jpql += " i.price <= :maxPrice";
        }
        log.info("jpql={}", jpql);
        TypedQuery<Item> query = em.createQuery(jpql, Item.class);
        if (StringUtils.hasText(itemName)) {
            query.setParameter("itemName", itemName);
        }
        if (maxPrice != null) {
            query.setParameter("maxPrice", maxPrice);
        }
        return query.getResultList();
    }
}- private final EntityManager em : 생성자에서 스프링을 통해 엔티티 매니저 주입받음. JPA의 모든 동작은 엔티티 매니저를 통해 이루어짐. 엔티티 매니저는 내부에 데이터소스를 가지고 있고, 데이터베이스에 접근할 수 있음.
- @Transactional : JPA의 모든 변경은 트랜잭션 안에서 이루어져야 함. 원래 비즈니스 로직인 서비스 계층에서 걸지만, 지금은 리포지토리에 걸었음.
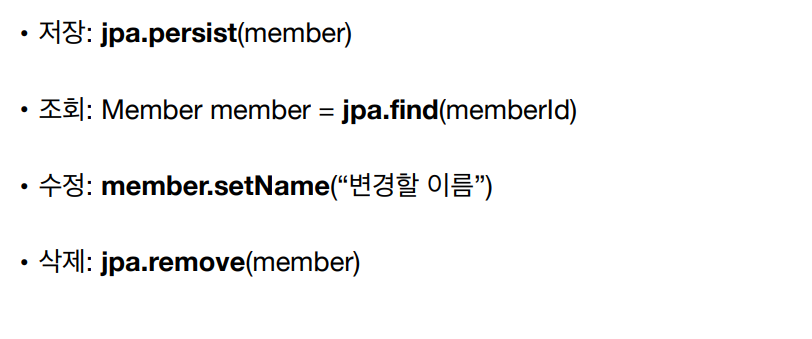
- save()
- em.persist(item) : JPA에서 객체를 테이블에서 저장할 때 엔티티 매니저가 제공하는 persist() 사용
- JPA가 만들어서 실행한 SQL : insert into item (item_name, price, quantity) values (?, ?, ?)
-> 쿼리 실행 이후 id 필드에 데이터베이스가 생성한 pk값이 들어간 뒤 id 결과를 받아서 넣어줌
- update()
- em.update() 같은 메소드를 호출 X
-> JPA는 트랜잭션이 커밋되는 시점에 변경된 엔티티가 있으면 update SQL 실행 - JPA가 만들어서 실행한 SQL : update item set item_name=?, price=?, quantity=? where id=?
- em.update() 같은 메소드를 호출 X
- findById()
- em.find(Item.class, id) : find() 메소드를 사용, 조회 타입, PK 값을 파라미터로 넘김
-> JPA가 SQL 실행 후 결과를 바로 객체로 변환해줌
- em.find(Item.class, id) : find() 메소드를 사용, 조회 타입, PK 값을 파라미터로 넘김
- findAll()
- em.createQuery(jpql, Item.class)
- JPQL (Java Persistence Query Language 객체지향 쿼리 언어) : 여러 데이터를 복잡한 조건으로 조회할 때 사용
- JPA를 사용했을 때 동적 쿼리 문제 -> Querydsl 기술 사용하는 것이 좋음
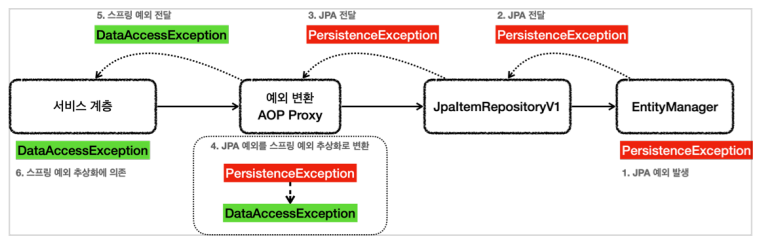
- @Repository
- 1) 컴포넌트 스캔의 대상
2) 예외 변환 AOP의 적용 대상 (예외변환 AOP 프록시를 만들어줌) - EntityManager는 순수한 JAP 기술이고, 스프링과 관계 X -> 엔티티 매니저는 JPA 관련 예외 발생시킴
-> @Repository -> JPA 예외 변환기 (PersistenceExceptionTranslator) 등록 -> 예외변환 AOP 프록시
-> JPA 예외를 스프링 예외로 변환
- 1) 컴포넌트 스캔의 대상
5) JpaConfig
package hello.itemservice.config;

import hello.itemservice.repository.ItemRepository;
import hello.itemservice.repository.jpa.JpaItemRepository;
import hello.itemservice.repository.mybatis.MyBatisItemRepository;
import hello.itemservice.service.ItemService;
import hello.itemservice.service.ItemServiceV1;
import org.springframework.context.annotation.Bean;
import org.springframework.context.annotation.Configuration;

import javax.persistence.EntityManager;

@Configuration
public class JpaConfig {

    private final EntityManager em;

    public JpaConfig(EntityManager em) {
        this.em = em;
    }

    @Bean
    public ItemService itemService() {
        return new ItemServiceV1(itemRepository());
    }
    @Bean
    public ItemRepository itemRepository() {
        return new JpaItemRepository(em);
    }
}
6) ItemServiceApplication
- jpa config 클래스 설정
@Slf4j
@Import(JpaConfig.class)
@SpringBootApplication(scanBasePackages = "hello.itemservice.web")
public class ItemServiceApplication { }
'Spring' 카테고리의 다른 글
| [인프런/스프링 DB 2편] 4. 데이터 접근 기술 (5) Query DSL (0) | 2023.07.17 |
|---|---|
| [인프런/스프링 DB 2편] 4. 데이터 접근 기술 (4) SpringDataJPA (0) | 2023.07.13 |
| [인프런/스프링 DB 2편] 4. 데이터 접근 기술 (2) MyBatis (0) | 2023.07.06 |
| [인프런/스프링 DB 2편] 3. 데이터 접근 기술 - 테스트와 DB 연동 (0) | 2023.06.30 |
| [인프런/스프링 DB 2편] 2. 데이터 접근 기술 (1) JdbcTemplate (0) | 2023.06.28 |