1. JDBC

- Java DataBase Connectivity
- 자바 애플리케이션에서 데이터베이스 액세스(접속해서 SQL실행)에 필요한 객체들의 표준(인터페이스)을 정의
- 각 데이터베이스 제조사가 java.sql, javax.sql 패키지에 정의된 인터페이스(표준)를 구현해서 자사의 데이터베이스에 액세스할 수 있는 구현클래스를 제공하고 있음 ( JDBC 드라이버 )
1-1. 주요 API
- Connection 인터페이스
- 자바프로그램과 데이터베이스간의 연결을 담당하는 객체다.
- Statement createStatement()
: SQL전송을 담당하는 Statement객체를 반환한다. - PreparedStatement prepareStatement(String sql)
: SQL전송을 담당하는 Statement객체를 반환한다. - void commit()
: SQL실행결과를 DB에 반영시킨다. - void rollback()
: SQL실행결과의 DB 반영을 취소시킨다. - void close()
: DB와의 접속을 해제한다.
- PreparedStatement 인터페이스
- SQL의 전송, 실행을 담당하는 객체다.
- int executeUpdate()
: INSERT, UPDATE, DELETE 쿼리를 DB로 전송하고, 실행결과를 정수로 반환한다. ( 그 행의 개수 반환 ) - ResultSet executeQuery()
: SELECT 쿼리를 DB로 전송하고, 조회결과를 ResultSet 객체로 반환한다. - void setXXX(int index, XXX value)
- ? 위치에 실제값(파라미터값)을 설정한다.
- void setString(int index, String value)
- void setInt(int index, int value)
- void setLong(int index, long value)
- void setDouble(int index, double value)
- void setDate(int index, Date value)
- void close()
: DB 연결 자원을 해제한다.
- ResultSet 인터페이스
- SELECT 쿼리문의 조회결과를 담당하는 객체다.
- boolean next()
: 커서를 다음행으로 이동시킨다. 데이터행이 존재하면 true를 반환한다. - XXX getXXX(String columnName)
- 컬럼명에 해당하는 값을 반환한다.
- String getString(String columnName);
- int getInt(String columnName);
- long getLong(String columnName);
- double getDouble(String columnName);
- Date getDate(String columnName);
- void close()
: DB 연결 자원을 해제한다.
1-2. 자바와 데이터베이스의 연동절차
1. OracleDriver클래스를 자바가상머신의 드라이버 레지스트리에 "jdbc:oracle:thin"이라는 이름으로 등록시키기
- Class.forName(클래스의 전체경로)는 지정된 클래스를 메모리의 설계도 영역에 로딩시킨다.
- oracle 데이터베이스의 jdbc 패키지에서 OracleDriver 클래스를 찾아서 메모리에 로딩
- OracleDriver는 메모리에 로딩이 완료되면 자바가상머신의 드라이버 레지스트리에 jdbc:oracle:thin 이라는 이름으로 오라클 드라이버를 등록시킨다.
Class.forName("oracle.jdbc.OracleDriver");
2. 데이터베이스와 연결을 담당하는 Connection 인터페이스의 구현객체 획득하기
- 드라이버 레지스트리에 등록된 OracleDriver 클래스는 url, usernames, password를 전달받아서 데이터베이스와 연결을 담당하는 Connection 인터페이스 구현객체를 제공한다.
- url의 "jdbc:oracle:thin" : 드라이버 레지스트리에 등록된 이름. 이 이름으로 등록된 드라이버 클래스를 갖고옴
( jdbc:데이터베이스이름:서버이름)
- url의 "@localhost:1521:xe"의 @localhost : 데이터베이스가 설치된 컴퓨터의 이름
1521 : 데이터베이스가 사용하는 포트번호
xe : 데이터베이스를 식별하는 고유한 이름
( 내 컴퓨터 : 포트번호 : 데이터베이스의 식별자 )
=> thin타입의 jdbc의 oracle 드라이버에 있는 내 컴퓨터의 1521포트번호에 해당하는 xe 이름인 데이터베이스를 연결해라
- DriverManager는 자바가상머신의 드라이버 레지스트리를 관리하는 클래스이다.
- DriverManager의 getConnection(url, username, password)는 지정된 url의 데이터베이스와 연결을 유지하는 java.sql.Connection 인터페이스를 구현한 구현객체를 반환한다. (구현객체는 ojdbc11.jar에서 제공한다.)
( jdbc가 드라이버 클래스를 가져오면 여기 설정된 정보를 이용해서 필요한 객체를 ojdbc11.jar안에서 가져옴 )
- 데이터베이스 엑세스에 필요한 커넥션 인터페이스의 구현객체를 제공 받음
- 이 Connection 객체 안에는 close, createStatement등의 메소드등이 구현
String url = "jdbc:oracle:thin:@localhost:1521:xe";
String username = "hr";								// 이 계정으로 연결
String password = "zxcv1234";
Connection connection = DriverManager.getConnection(url, username, password);	// 예외발생
3. SQL을 데이터베이스로 전송, 실행시키는 PreparedStatement 인터페이스 구현 객체 획득하기
// 값이 들어갈 자리가 ? 로 표시된 SQL을 정의한다.
String sql = "insert into sample_users "
	+ "(user_id, user_password, user_email, user_name, user_tel, user_point)"
	+ "values "
	+ "(?, ?, ?, ?, ?, ?)";
PreparedStatement pstmt = connection.prepareStatement(sql);
4. SQL의 ?자리에 실제값 바인딩하기
pstmt.setString(1, "hong-gd");		// user_id (VARCHAR2) 컬럼의 값
pstmt.setString(2, "hong@naver.com");	// user_email(VARCHAR2)
pstmt.setString(3, "zxcv1234");		// user_password (VARCHAR2)
pstmt.setString(4, "홍길동");		// user_name (VARCHAR2)
pstmt.setString(5, "010-1111-1111");	// user_tel (VARCHAR2)
pstmt.setInt(6, 100);			// user_point (NUMBER)
5. SQL을 데이터베이스로 전송, 실행시킨다.
int rowCount = pstmt.executeUpdate();
System.out.println(rowCount + "개의 행이 추가되었습니다.");
6. 데이터베이스 액세스 작업에 사용했던 모든 리소스 연결해제
pstmt.close();
connection.close();
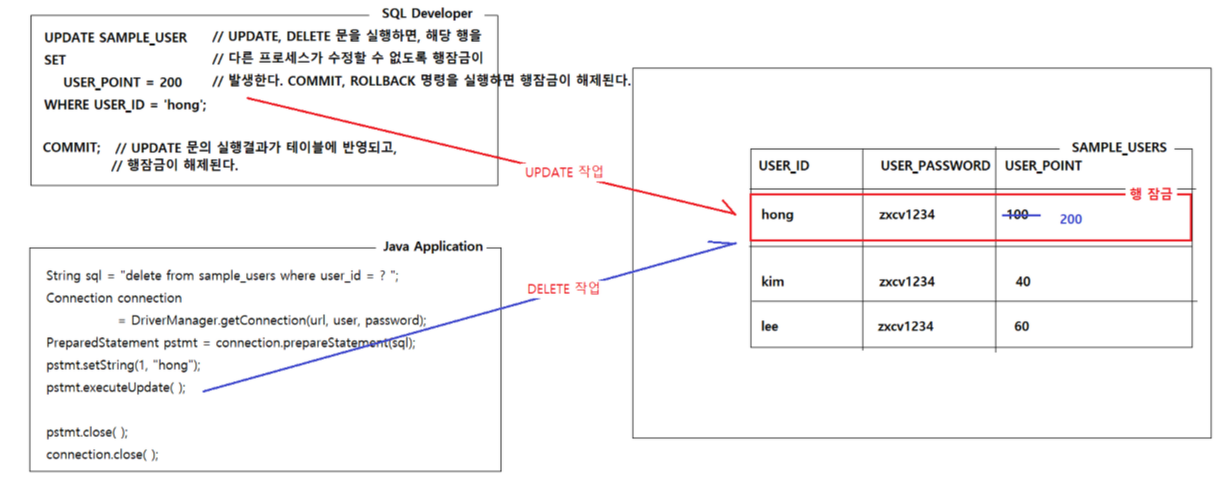
** update, delete 문을 실행하면, 해당 행을 다른 프로세스가 동시에 수정할 수 없도록 행잠금 발생
-> commit, rollback 명령을 실행하면 행잠금 해제
1-3. 자바로 데이터 추가
import java.sql.Connection;
import java.sql.DriverManager;
import java.sql.PreparedStatement;
import java.sql.SQLException;

public class DataBaseApp1 {

	public static void main(String[] args) throws ClassNotFoundException, SQLException {	// 1에서 발생하는 예외 처리

		// 값이 들어갈 자리가 ? 로 표시된 SQL을 정의한다.
		String sql = "insert into sample_users "
				+ "(user_id, user_password, user_email, user_name, user_tel, user_point) "
				+ "values "
				+ "(?, ?, ?, ?, ?, ?)";


		// 1. oracle.jdbc.OracleDriver를 자바가상머신의 드라이버 레지스트리에 "jdbc:oracle:thin"이라는 이름으로 등록시키기
		Class.forName("oracle.jdbc.OracleDriver");	//예외발생

		// 2. 데이터베이스와 연결을 담당하는 Connection 인터페이스의 구현객체 획득하기
		String url = "jdbc:oracle:thin:@localhost:1521:xe";
		String username = "hr";			// 이 계정으로 연결
		String password = "zxcv1234";
		Connection connection = DriverManager.getConnection(url, username, password);	//예외발생

		// 3. SQL을 데이터베이스로 전송, 실행히키는 인터페이스 구현
		PreparedStatement pstmt = connection.prepareStatement(sql);

		// 4. SQL의 ?자리에 실제값 바인딩하기
		pstmt.setString(1, "hong-gd");		// user_id (VARCHAR2) 컬럼의 값
		pstmt.setString(2, "hong@naver.com");	// user_email(VARCHAR2)
		pstmt.setString(3, "zxcv1234");		// user_password (VARCHAR2)
		pstmt.setString(4, "홍길동");		// user_name (VARCHAR2)
		pstmt.setString(5, "010-1111-1111");	// user_tel (VARCHAR2)
		pstmt.setInt(6, 100);			// user_point (NUMBER)

		// 5. SQL을 데이터베이스로 전송, 실행시킨다.
		int rowCount = pstmt.executeUpdate();
		System.out.println(rowCount + "개의 행이 추가되었습니다.");

		// 6. 데이터베이스 액세스 작업에 사용했던 모든 리소스 연결해제
		pstmt.close();
		connection.close();

	}
}
1-4. 자바로 데이터 삭제
import java.sql.Connection;
import java.sql.DriverManager;
import java.sql.PreparedStatement;

public class DataBaseApp2 {

	public static void main(String[] args) throws Exception {

		String sql = "delete from sample_users "
				+ "where user_id = ? ";

		// Oracle JDBC 드라이브 클래스를 메모리에 로딩
		Class.forName("oracle.jdbc.OracleDriver");

		// Connection(데이터베이스와 연결을 유지하는 객체) 구현객체 획득
		Connection connection = DriverManager.getConnection("jdbc:oracle:thin:@localhost:1521:xe", "hr", "zxcv1234");

		// PreparedStatement(SQL의 전송을 담당하는 객체) 구현객체 획득
		PreparedStatement pstmt = connection.prepareStatement(sql);

		// ?에 값 바인딩하기
		pstmt.setString(1, "hong");		// ? 에는 삭제할 사용자아이디 값이 지정되어야 한다.

		// SQL를 데이터베이스로 전송하고, 결과값 받기
		int rowCount = pstmt.executeUpdate();		// 삭제, 변경을 이 메소드로 이용
		System.out.println(rowCount + " 개의 행이 삭제되었습니다.");

		// 자원 반납하기
		pstmt.close();
		connection.close();
	}
}
0 개의 행이 삭제되었습니다.
1-5. 자바로 데이터 변경
import java.sql.Connection;
import java.sql.DriverManager;
import java.sql.PreparedStatement;

public class DateBaseApp3 {

	public static void main(String[] args) throws Exception {
		String sql = "update employees "
				+ "set "
				+ " salary = salary + 500 "
				+ "where department_id = ? ";

		Class.forName("oracle.jdbc.OracleDriver");

		Connection connection = DriverManager.getConnection("jdbc:oracle:thin:@localhost:1521:xe", "hr", "zxcv1234");

		PreparedStatement pstmt = connection.prepareStatement(sql);
		pstmt.setInt(1, 60);	// ?에 바인딩되는 값은 부서아이디(NUMBER)이다.
		int rowCount = pstmt.executeUpdate();
		System.out.println(rowCount + " 개의 행이 변경되었습니다.");

		pstmt.close();
		connection.close();

	}
}
5 개의 행이 변경되었습니다.
* 실행시켜도 아무것도 안뜰 때 -> commit 을 해야 함 (행잠금)
※ JDBC를 이용한 데이터베이스 연동
** INSERT, UPDATE, DELETE 작업
- 테이블의 데이터를 변경(추가, 변경, 삭제)하는 작업
- 결과값은 항상 변경된 행의 개수
* 1, 2, 3, 5, 6 수행문은 고정 (항상 같은 코드)
* 0, 4 수행문은 실행하는 작업마다 다른 코드
0. SQL 작성하기
String sql = "insert into sample_products (product_no, product_name, product_price) values (?, ?, ?)";
1. Oracle JDBC 드라이버를 메모리에 로딩시킨다.
Class.forName("oracle.jdbc.OracleDriver");
2. Connection 구현객체를 획득한다.
String url = "jdbc:oracle:thin:@localhost:1521:xe";
String user = "hr";
String password = "zxcv1234";
Connection connection = DriverManager.getConnection(url, user, password);
3. PreparedStatement 구현객체를 획득한다.
PreparedStatement pstmt = connection.prepareStatement(sql);
4. SQL에 ? 가 있으면 값을 바인딩한다.
pstmt.setInt(1, 100);
pstmt.setString(2, "iphone 14 pro max");
pstmt.setInt(3, 1500000);
5. SQL을 데이터베이스로 전송하고 실행시킨다.
int rowCount = pstmt.executeUpdate();
System.out.println(rowCount + " 개의 행이 추가/변경/삭제 되었습니다.");
6. 리소스를 해제한다.
pstmt.close();
connection.close();
1-6. 자바로 데이터 조회

ResultSet rs = pstmt.executeQuery(); // 값을 select (조회)할 때는 쿼리메소드를 실행, ResultSet객체를 반환함
while( rs.next() ) { // next 메소드를 이용해서 커서 이동시키기
String id = rs.getString("user_id"); // get 메소드를 이용해서 값 꺼내기
String password = rs.getString("user_password");
int point = rs.getInt("user_point");
Date createdDate = rs.getDate("user_created_date");
}
- ResultSet 객체에는 내장된 커서가 있는데 첫번째 행보다 위에 위치 (행제목)
- next();
실행하면 다음 행으로 이동 -> 데이터행이 존재하면 true, 존재하지 않으면 false
값을 추출할 때는 getXXX(String columnName) 메소드 사용
import java.sql.Connection;
import java.sql.DriverManager;
import java.sql.PreparedStatement;
import java.sql.ResultSet;
import java.text.MessageFormat;
import java.util.Date;

public class DataBaseApp4 {

	public static void main(String[] args) throws Exception {

		String sql = "select * "
				+ "from sample_users "
				+ "order by user_id asc ";

		Class.forName("oracle.jdbc.OracleDriver");

		Connection connection = DriverManager.getConnection("jdbc:oracle:thin:@localhost:1521:xe", "hr", "zxcv1234");
		PreparedStatement pstmt = connection.prepareStatement(sql);
		ResultSet rs = pstmt.executeQuery();		// select 문일때는 변경이 아니라 조회니까 이 메소드

		while(rs.next()) {
			String id = rs.getString("user_id");
			String password = rs.getString("user_password");
			String email = rs.getString("user_email");
			String tel = rs.getString("user_tel");
			int point = rs.getInt("user_point");
			String disabled = rs.getString("user_disabled");
			Date createdDate = rs.getDate("user_created_date");
			Date updatedDate = rs.getDate("user_updated_date");

			String text = MessageFormat.format("{0} {1} {2} {3} {4} {5} {6} {7} {8}",
					id, password, email, tel, point, disabled, createdDate, updatedDate);
			System.out.println(text);
		}

		rs.close();
		pstmt.close();
		connection.close();
	}
}
ahn zxcv1234 ahn@naver.com 010-1111-5555 0 N 22. 10. 17. 오후 4:21 22. 10. 17. 오후 4:21 {8}
hong zxcv1234 hong@naver.com 010-1111-1111 0 N 22. 10. 17. 오후 4:21 22. 10. 17. 오후 4:21 {8}
kang zxcv1234 kang@naver.com 010-1111-4444 0 N 22. 10. 17. 오후 4:21 22. 10. 17. 오후 4:21 {8}
kim zxcv1234 kim@naver.com 010-1111-2222 0 N 22. 10. 17. 오후 4:21 22. 10. 17. 오후 4:21 {8}
lee zxcv1234 lee@naver.com 010-1111-3333 0 N 22. 10. 17. 오후 4:21 22. 10. 17. 오후 4:21 {8}
import java.sql.Connection;
import java.sql.DriverManager;
import java.sql.PreparedStatement;
import java.sql.ResultSet;
import java.text.MessageFormat;

public class DateBaseApp5 {

	public static void main(String[] args) throws Exception {

		String sql = "select employee_id, first_name, job_id, salary, salary*12 as annual "
				+ "from employees "
				+ "where department_id = ? "
				+ "order by employee_id asc ";

		Class.forName("oracle.jdbc.OracleDriver");

		String url = "jdbc:oracle:thin:@localhost:1521:xe";
		String user = "hr";
		String password = "zxcv1234";
		Connection connection = DriverManager.getConnection(url, user, password);

		PreparedStatement pstmt = connection.prepareStatement(sql);
		pstmt.setInt(1, 60);

		ResultSet rs = pstmt.executeQuery();
		while(rs.next()) {
			int id = rs.getInt("employee_id");
			String name = rs.getString("first_name");
			String job = rs.getString("job_id");
			double salary = rs.getDouble("salary");
			double annualSalary = rs.getDouble("annual");

			String text = MessageFormat.format("{0} {1} {2} {3} {4}", id, name, job, salary, annualSalary);
			System.out.println(text);

		}
	}
}
103 Alexander IT_PROG 9,500 114,000
104 Bruce IT_PROG 6,500 78,000
105 David IT_PROG 5,300 63,600
106 Valli IT_PROG 5,300 63,600
107 Diana IT_PROG 4,700 56,400
※ JDBC를 이용한 데이터베이스 연동
** SELECT 작업
- 테이블의 데이터를 조회하는 작업
- 결과값은 0개 이상의 행이다.
* 1, 2, 3, 5, 7 수행문은 고정 (항상 같은 코드)
* 0, 4, 6 수행문은 실행하는 작업마다 다른 코드
0. SQL 작성하기
String sql = "select product_no, product_name, product_price, product_discount_price "
+ "from sample_products "
+ "where product_price >= ? and product_price <= ? "
+ "order by product_price asc ";
1. Oracle JDBC 드라이버를 메모리에 로딩시킨다.
Class.forName("oracle.jdbc.OracleDriver");
2. Connection 구현객체를 획득한다.
String url = "jdbc:oracle:thin:@localhost:1521:xe";
String user = "hr";
String password = "zxcv1234";
Connection connection = DriverManager.getConnection(url, user, password);
3. PreparedStatement 구현객체를 획득한다.
PreparedStatement pstmt = connection.prepareStatement(sql);
4. SQL에 ? 가 있으면 값을 바인딩한다.
pstmt.setInt(1, 50000);
pstmt.setInt(2, 200000);
5. SQL을 데이터베이스로 전송하고 실행시킨다.
ResultSet rs = pstmt.executeQuery();
6. ResultSet에서 조회된 데이터를 추출한다.
while(rs.next()) {
int no = rs.getInt("product_no");
String name = rs.getString("product_name");
int price = rs.getInt("product_price");
int discountPrice = rs.getInt("product_discount_price");
System.out.println(no + "," + name + "," + price + "," + discountPrice);
}
7. 리소스를 해제한다.
rs.close();
pstmt.close();
connection.close();
'수업내용 > SQL' 카테고리의 다른 글
| [2022.10.20. 목] 오라클 내장함수 - 다중행함수 (0) | 2022.10.20 |
|---|---|
| [2022.10.19.수] 조인 (0) | 2022.10.19 |
| [2022.10.18.화] 오라클 내장함수 - 단일행 함수 (0) | 2022.10.18 |
| [2022.10.14.금] DML (데이터 조회, 정렬, 추가, 변경, 삭제) (0) | 2022.10.14 |
| [2022.10.13.목] 데이터베이스 (0) | 2022.10.13 |